Create a project, prompt, active agent, and first run in the AIR staging console.
In about ten minutes, you will create an active agent and see its first run in
the AIR trace viewer. You do not need a model-provider key for the staging smoke
test.
Select a screenshot to zoom. The screenshots use a disposable staging project
and contain no API keys or provider credentials.
A model-provider key only when you are ready to use a real OpenAI or Anthropic model
1
Create a project
Sign in, select New project, enter a descriptive name, and select
Create project. A project is the boundary for agents, tools, members,
keys, and provider credentials.
Create a project from the Projects screen.
2
Write the agent instructions
Open Prompts, select New prompt, and name it Support assistant.
Open the prompt, select New version, and enter:
You are a concise support assistant. Answer using the information in therun input. If information is missing, explain what you need.
Add a short change note and create the version.
Prompt versions preserve the exact instructions used by each run.
3
Create and activate an agent
Open Agents, select New agent, and name it Support agent. Reuse the
prompt version you just created.For the first staging smoke test, choose Bring your own provider key,
then select Testing and fake-echo. This built-in model requires no
key. Leave Activate immediately selected and choose Create & start
serving.
An agent version binds one prompt version, model, allowed-tool set, and limits.
For real responses, choose OpenAI or Anthropic and connect the project
provider key when prompted. Keys are encrypted and never shown again.
4
Run the agent in the console
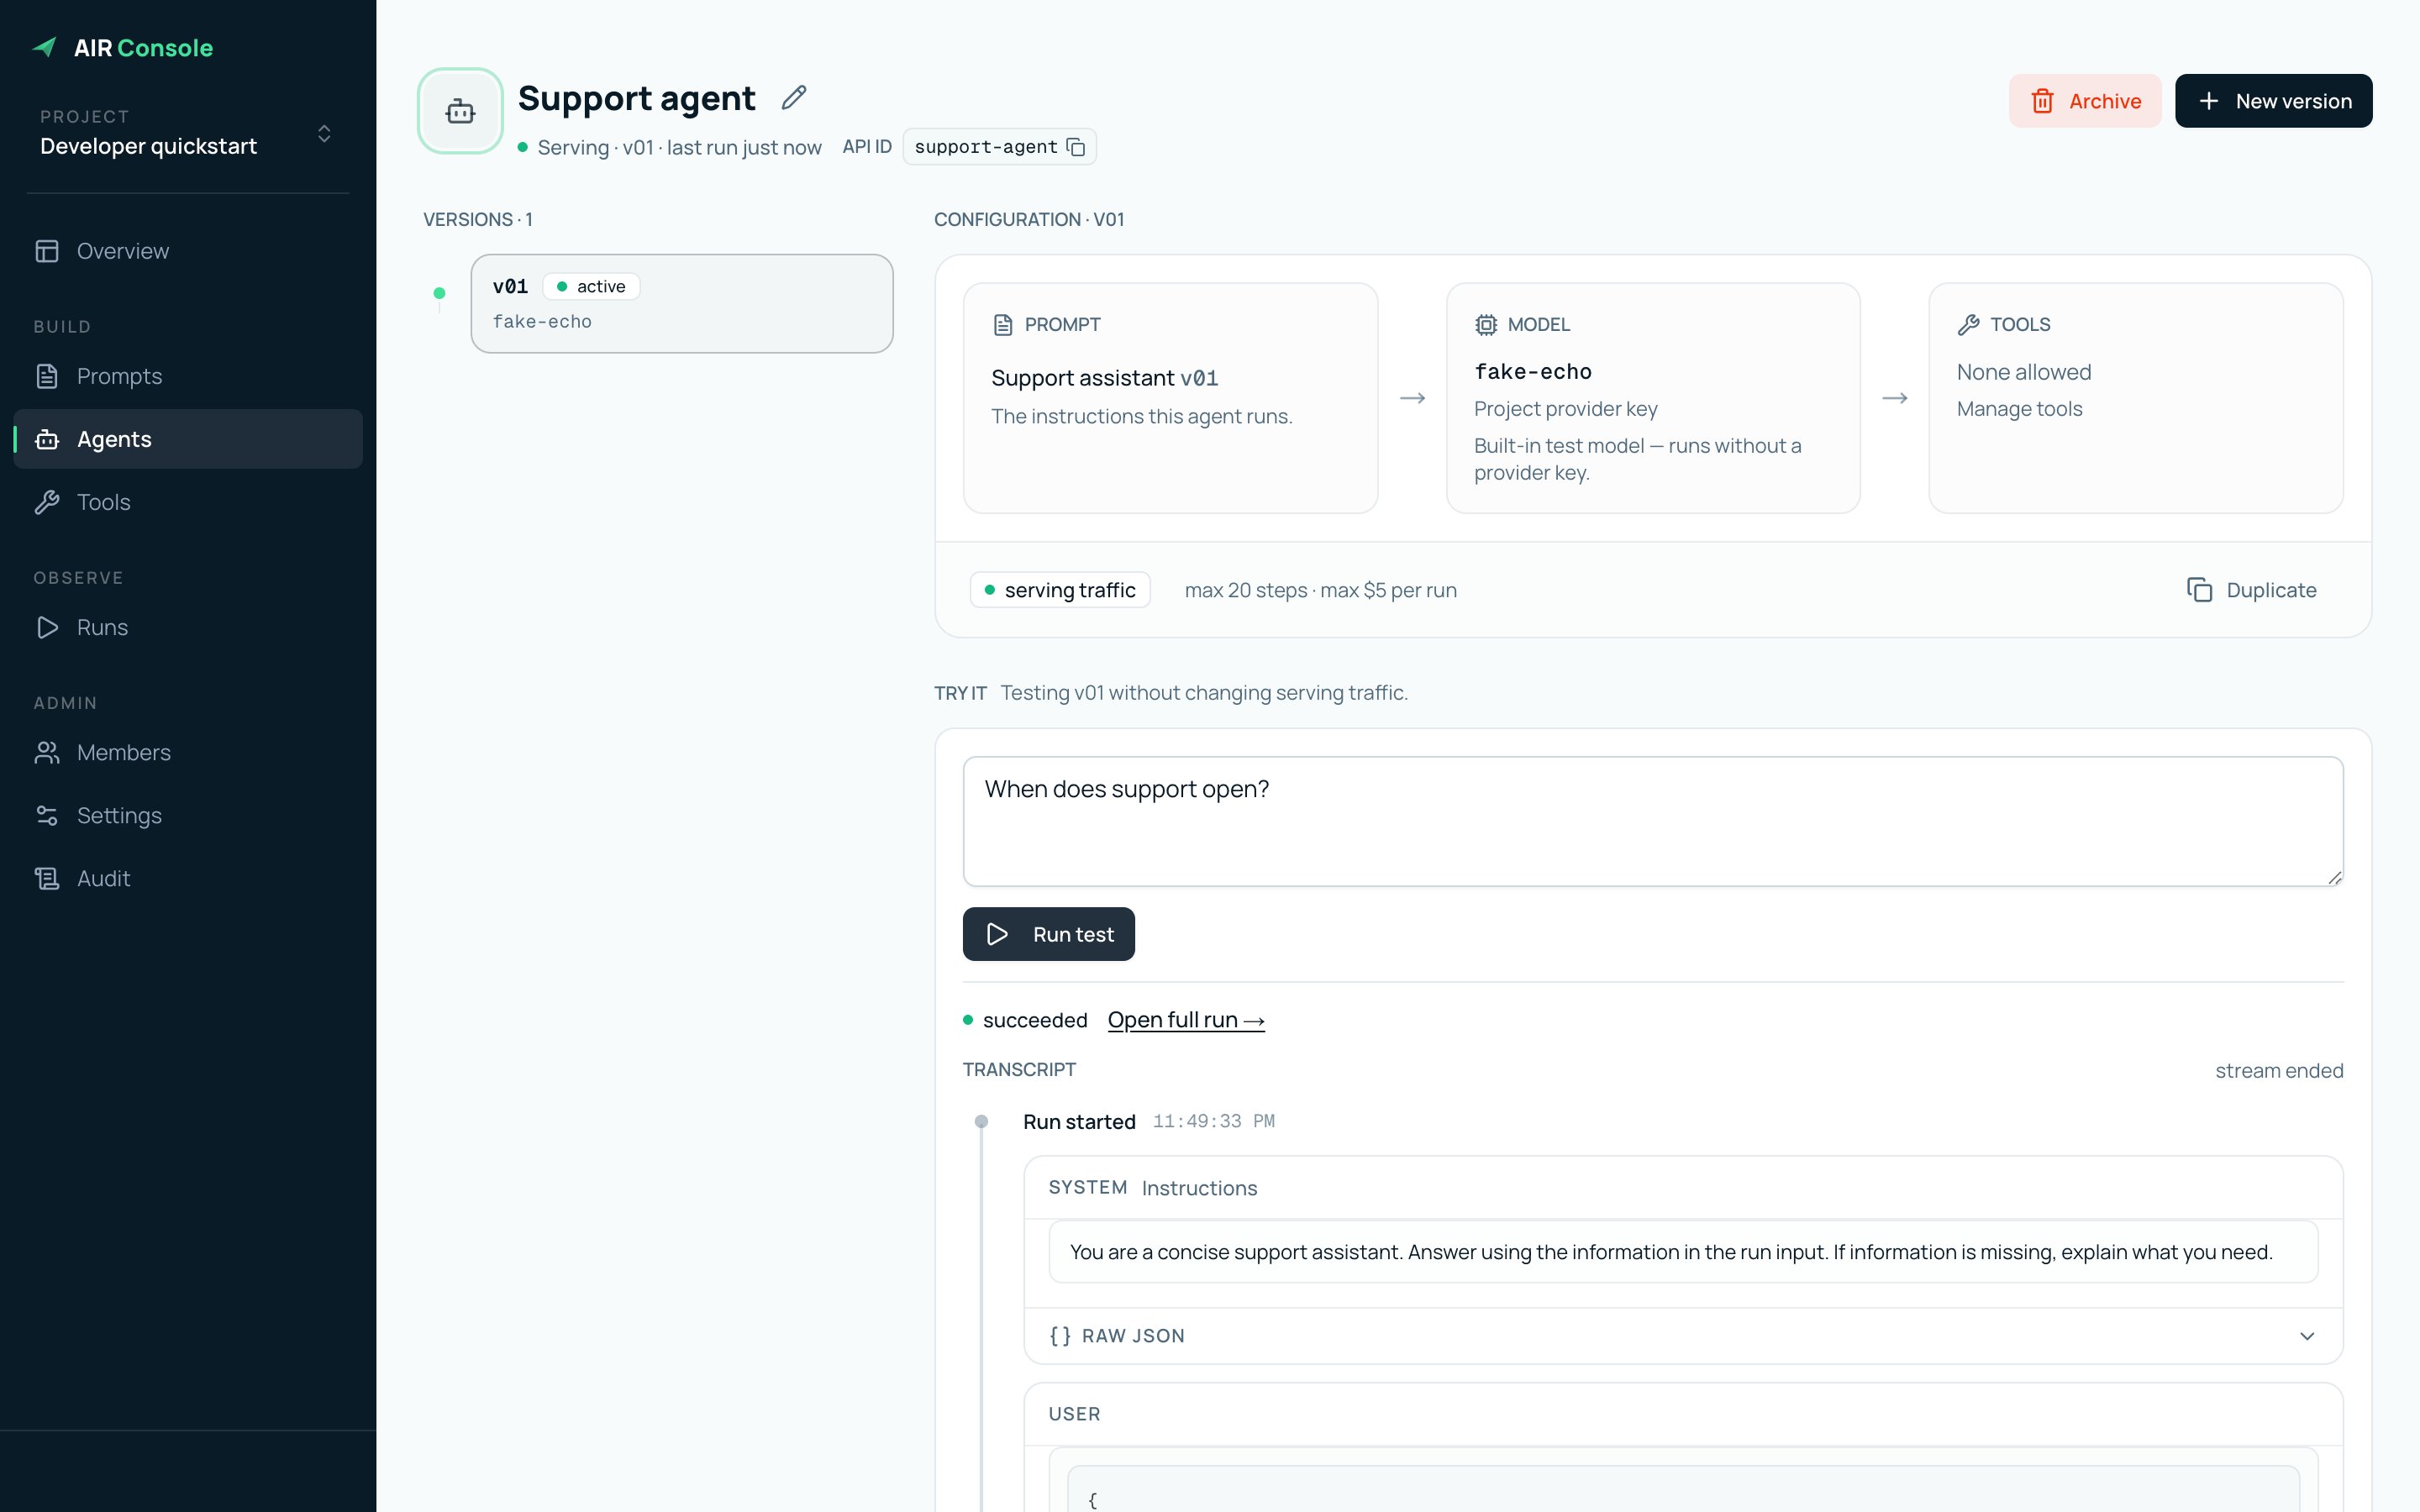
In the agent’s Try it panel, enter When does support open? and select
Run test. The Output · streaming panel appears after the first model
chunk and grows while the run is active. The transcript records the same
event sequence without changing the active configuration.
The Try it panel is the fastest way to verify a new agent version.
5
Inspect the trace
Select Open full run. The trace shows the exact agent and prompt
versions, token usage, cost, model latency, request, response, and immutable
configuration snapshot.
A successful run trace with timing, token usage, cost, and model output.
6
Issue an app key
Open Settings and select Issue app key. Copy the key once into your
local environment or secret manager. Do not put it in source control.
Copy the agent API ID from the agent page and use it as agent_id:
import asyncioimport osfrom air import AirClientasync def main() -> None: async with AirClient( os.environ["AIR_BASE_URL"], os.environ["AIR_APP_KEY"], ) as client: run = await client.runs.create( agent_id="support-agent", input={"message": "When does support open?"}, context={"tenant_id": "demo"}, ) result = await client.runs.wait(run.id, timeout=120) print(result.status, result.output)asyncio.run(main())
You now have a project, versioned instructions, an active agent, a successful
trace, and application access. Next, connect a private worker.
Was this page helpful?
{"docsConfig":{"theme":"mint","$schema":"https://mintlify.com/docs.json","name":"Papermap","colors":{"primary":"#16A34A","light":"#07C983","dark":"#15803D"},"logo":{"light":"https://mintcdn.com/papermap/8hXnlJ8qeTMpHWXU/logo/light.png?fit=max\u0026auto=format\u0026n=8hXnlJ8qeTMpHWXU\u0026q=85\u0026s=a982bbb381d342be222ed1a362cb948b","dark":"https://mintcdn.com/papermap/8hXnlJ8qeTMpHWXU/logo/dark.png?fit=max\u0026auto=format\u0026n=8hXnlJ8qeTMpHWXU\u0026q=85\u0026s=5f67486055f4d67be5e4fd9716fe98c8"},"favicon":"https://mintcdn.com/papermap/U6wjzYF3zubg06mn/favicon.ico?fit=max\u0026auto=format\u0026n=U6wjzYF3zubg06mn\u0026q=85\u0026s=5ed2d4f8cb3791772fabccfff5a3e763","navbar":{"links":[{"href":"https://calendly.com/admin-pappermap/30min","label":"Support"}],"primary":{"type":"button","label":"Workspaces","href":"https://www.papermap.ai/auth/login"}},"footer":{"socials":{"x":"https://x.com/PapermapAI","instagram":"https://www.instagram.com/papermap.ai","linkedin":"https://www.linkedin.com/company/papermap"}},"contextual":{"options":["copy","view","chatgpt","claude","perplexity","mcp","cursor","vscode"],"display":"header"},"styling":{"latex":false},"navigation":{"global":{"anchors":[{"anchor":"Your Workspaces","icon":"book-open-cover","href":"https://www.papermap.ai/auth/login"}]},"pages":[]}},"deployment":{"deploymentMetadataValue":{"subdomain":"papermap","hasAudioNarration":false,"actualSubdomain":"papermap","customDomains":["docs.papermap.ai"],"gitSource":{"type":"github","owner":"papermap-ai","repo":"docs","deployBranch":"main","contentDirectory":"","isPrivate":true,"mountPath":"","label":""},"chroma":{"liveDeploymentHistoryId":"6a5ab602cc82a0c5133c1b29","collectionId":"a21f9324-e069-46af-b751-f3b5ca51faea","schemaVersion":"v3","latestBuiltDeploymentHistoryId":"6a5ab602cc82a0c5133c1b29"},"feedback":{"thumbs":true},"entitlements":{},"buildId":"6a5ab602cc82a0c5133c1b29:success","clientVersion":"0.0.3926","searchFilterCounts":[{"language":"default","tag":"Documentation","count":26},{"language":"default","tag":"AIR","count":13},{"language":"default","tag":"Multi-Tenancy","count":11},{"language":"default","tag":"Embedding","count":8},{"language":"default","tag":"Terminal UI","count":7},{"language":"default","tag":"Start here","count":4},{"language":"default","tag":"Features","count":4},{"language":"default","tag":"API Reference","count":4},{"language":"default","tag":"Connect private tools","count":3},{"language":"default","tag":"Build agents and apps","count":2}]},"assistantConfig":{"enableAskAiButton":false,"enableStarterQuestions":false,"enableAskAiSearchBar":true},"hasChatPermissions":false,"hasWebMcpPermissions":false,"toggles":[{"name":"kill-isr","enabled":true,"variant":{"name":"disabled","enabled":false,"feature_enabled":true},"impressionData":false},{"name":"agent-mintlify-slack","enabled":true,"variant":{"name":"disabled","enabled":false,"feature_enabled":true},"impressionData":false},{"name":"editor-v7-file-tree","enabled":true,"variant":{"name":"disabled","enabled":false,"feature_enabled":true},"impressionData":false},{"name":"agent-integrations-settings","enabled":true,"variant":{"name":"disabled","enabled":false,"feature_enabled":true},"impressionData":false},{"name":"automations-pr-grouping","enabled":true,"variant":{"name":"disabled","enabled":false,"feature_enabled":true},"impressionData":false},{"name":"custom-prefix","enabled":true,"variant":{"name":"disabled","enabled":false,"feature_enabled":true},"impressionData":false},{"name":"analytics-v7","enabled":true,"variant":{"name":"disabled","enabled":false,"feature_enabled":true},"impressionData":false},{"name":"user-flows-analytics","enabled":true,"variant":{"name":"disabled","enabled":false,"feature_enabled":true},"impressionData":false},{"name":"no-publish-flow","enabled":true,"variant":{"name":"disabled","enabled":false,"feature_enabled":true},"impressionData":false},{"name":"workos-onboarding","enabled":true,"variant":{"name":"disabled","enabled":false,"feature_enabled":true},"impressionData":false},{"name":"llms-txt-v2","enabled":true,"variant":{"name":"disabled","enabled":false,"feature_enabled":true},"impressionData":false},{"name":"pause-universal-search-reconcile","enabled":true,"variant":{"name":"disabled","enabled":false,"feature_enabled":true},"impressionData":false},{"name":"snapshot-serving-live","enabled":true,"variant":{"name":"disabled","enabled":false,"feature_enabled":true},"impressionData":false},{"name":"stripTemperatureMiddleware","enabled":true,"variant":{"name":"disabled","enabled":false,"feature_enabled":true},"impressionData":false},{"name":"per-site-search-delta","enabled":true,"variant":{"name":"disabled","enabled":false,"feature_enabled":true},"impressionData":false},{"name":"support-platform-pylon-zendesk","enabled":true,"variant":{"name":"disabled","enabled":false,"feature_enabled":true},"impressionData":false},{"name":"snapshot-serving","enabled":true,"variant":{"name":"disabled","enabled":false,"feature_enabled":true},"impressionData":false},{"name":"instant-rollback","enabled":true,"variant":{"name":"disabled","enabled":false,"feature_enabled":true},"impressionData":false},{"name":"granular-notifications-server","enabled":true,"variant":{"name":"disabled","enabled":false,"feature_enabled":true},"impressionData":false},{"name":"granular-notifications","enabled":true,"variant":{"name":"disabled","enabled":false,"feature_enabled":true},"impressionData":false},{"name":"editor-private-page-search","enabled":true,"variant":{"name":"disabled","enabled":false,"feature_enabled":true},"impressionData":false},{"name":"automations-fable","enabled":true,"variant":{"name":"disabled","enabled":false,"feature_enabled":true},"impressionData":false},{"name":"fixed-ai-action-pricing","enabled":true,"variant":{"name":"disabled","enabled":false,"feature_enabled":true},"impressionData":false},{"name":"automation-resolve-merge-conflict","enabled":true,"variant":{"name":"disabled","enabled":false,"feature_enabled":true},"impressionData":false},{"name":"scoped-publishing","enabled":true,"variant":{"name":"disabled","enabled":false,"feature_enabled":true},"impressionData":false},{"name":"mintql","enabled":true,"variant":{"name":"disabled","enabled":false,"feature_enabled":true},"impressionData":false},{"name":"page-level-analytics","enabled":true,"variant":{"name":"disabled","enabled":false,"feature_enabled":true},"impressionData":false},{"name":"editor-version-history-v2","enabled":true,"variant":{"name":"disabled","enabled":false,"feature_enabled":true},"impressionData":false},{"name":"editor-nav-generations","enabled":true,"variant":{"name":"disabled","enabled":false,"feature_enabled":true},"impressionData":false},{"name":"billing-page-v2","enabled":true,"variant":{"name":"disabled","enabled":false,"feature_enabled":true},"impressionData":false},{"name":"vite-origin","enabled":true,"variant":{"name":"disabled","enabled":false,"feature_enabled":true},"impressionData":false},{"name":"workspace-projects","enabled":true,"variant":{"name":"disabled","enabled":false,"feature_enabled":true},"impressionData":false},{"name":"assistant-v5","enabled":true,"variant":{"name":"disabled","enabled":false,"feature_enabled":true},"impressionData":false},{"name":"byok-sep-25","enabled":true,"variant":{"name":"disabled","enabled":false,"feature_enabled":true},"impressionData":false},{"name":"fork-pr-previews","enabled":true,"variant":{"name":"disabled","enabled":false,"feature_enabled":true},"impressionData":false},{"name":"revalidation-jwt","enabled":true,"variant":{"name":"disabled","enabled":false,"feature_enabled":true},"impressionData":false},{"name":"editor-agent-model-picker","enabled":true,"variant":{"name":"disabled","enabled":false,"feature_enabled":true},"impressionData":false},{"name":"hobby-abuse-scan","enabled":true,"variant":{"name":"disabled","enabled":false,"feature_enabled":true},"impressionData":false},{"name":"dashboard-inbox","enabled":true,"variant":{"name":"disabled","enabled":false,"feature_enabled":true},"impressionData":false}],"isAtlas":false,"googleFontsInlined":false},"customCss":[],"page":{"pagePath":"air/quickstart","slug":"/air/quickstart","pageMetadata":{"title":"Visual quickstart","sidebarTitle":"Quickstart","description":"Create a project, prompt, active agent, and first run in the AIR staging console.","icon":"rocket","href":"/air/quickstart"},"description":{"compiledSource":"\"use strict\";\nconst {jsx: _jsx} = arguments[0];\nconst {useMDXComponents: _provideComponents} = arguments[0];\nfunction _createMdxContent(props) {\n const _components = {\n p: \"p\",\n ..._provideComponents(),\n ...props.components\n };\n return _jsx(_components.p, {\n children: \"Create a project, prompt, active agent, and first run in the AIR staging console.\"\n });\n}\nfunction MDXContent(props = {}) {\n const {wrapper: MDXLayout} = {\n ..._provideComponents(),\n ...props.components\n };\n return MDXLayout ? _jsx(MDXLayout, {\n ...props,\n children: _jsx(_createMdxContent, {\n ...props\n })\n }) : _createMdxContent(props);\n}\nreturn {\n default: MDXContent\n};\n","frontmatter":{},"scope":{}},"pageType":"default","mdx":{"mdxSource":{"compiledSource":"\"use strict\";const{Fragment:_Fragment,jsx:_jsx,jsxs:_jsxs}=arguments[0];const{useMDXComponents:_provideComponents}=arguments[0];function _createMdxContent(props){const _components={a:`a`,code:`code`,li:`li`,p:`p`,pre:`pre`,span:`span`,strong:`strong`,ul:`ul`,..._provideComponents(),...props.components},{CodeBlock,Frame,Heading,Info,OptimizedImage,Step,Steps,Tip}=_components;if(!CodeBlock)_missingMdxReference(`CodeBlock`,true);if(!Frame)_missingMdxReference(`Frame`,true);if(!Heading)_missingMdxReference(`Heading`,true);if(!Info)_missingMdxReference(`Info`,true);if(!OptimizedImage)_missingMdxReference(`OptimizedImage`,true);if(!Step)_missingMdxReference(`Step`,true);if(!Steps)_missingMdxReference(`Steps`,true);if(!Tip)_missingMdxReference(`Tip`,true);return _jsxs(_Fragment,{children:[_jsx(_components.p,{children:`In about ten minutes, you will create an active agent and see its first run in\nthe AIR trace viewer. You do not need a model-provider key for the staging smoke\ntest.`}),`\n`,_jsx(Info,{children:_jsx(_components.p,{children:`Select a screenshot to zoom. The screenshots use a disposable staging project\nand contain no API keys or provider credentials.`})}),`\n`,_jsx(Heading,{level:`2`,id:`before-you-begin`,children:`Before you begin`}),`\n`,_jsxs(_components.ul,{children:[`\n`,_jsx(_components.li,{children:`Python 3.10 or newer`}),`\n`,_jsxs(_components.li,{children:[`Access to the `,_jsx(_components.a,{href:`https://dev.air.papermap.ai`,children:`AIR staging console`})]}),`\n`,_jsx(_components.li,{children:`A model-provider key only when you are ready to use a real OpenAI or Anthropic model`}),`\n`]}),`\n`,_jsxs(Steps,{titleSize:`h2`,children:[_jsxs(Step,{title:`Create a project`,id:`create-a-project`,children:[_jsxs(_components.p,{children:[`Sign in, select `,_jsx(_components.strong,{children:`New project`}),`, enter a descriptive name, and select\n`,_jsx(_components.strong,{children:`Create project`}),`. A project is the boundary for agents, tools, members,\nkeys, and provider credentials.`]}),_jsx(Frame,{caption:`Create a project from the Projects screen.`,children:_jsx(OptimizedImage,{src:`https://mintcdn.com/papermap/6FYSF5TTvsKzeVI6/air/images/create-project.png?fit=max\u0026auto=format\u0026n=6FYSF5TTvsKzeVI6\u0026q=85\u0026s=3d773567a3d522ba4f804bf6632fc6e1`,alt:`New project dialog with Developer quickstart entered as the project name`,\"data-og-width\":`2880`,width:`2880`,\"data-og-height\":`1800`,height:`1800`,\"data-path\":`air/images/create-project.png`,\"data-optimize\":`true`,\"data-opv\":`3`,srcset:`https://mintcdn.com/papermap/6FYSF5TTvsKzeVI6/air/images/create-project.png?w=280\u0026fit=max\u0026auto=format\u0026n=6FYSF5TTvsKzeVI6\u0026q=85\u0026s=8159662d5d3cb4a296fedff4b1325445 280w, https://mintcdn.com/papermap/6FYSF5TTvsKzeVI6/air/images/create-project.png?w=560\u0026fit=max\u0026auto=format\u0026n=6FYSF5TTvsKzeVI6\u0026q=85\u0026s=d5366551d46487d9986327cdfc6a0e61 560w, https://mintcdn.com/papermap/6FYSF5TTvsKzeVI6/air/images/create-project.png?w=840\u0026fit=max\u0026auto=format\u0026n=6FYSF5TTvsKzeVI6\u0026q=85\u0026s=45232b5d4c457f65491e28cc382aee7e 840w, https://mintcdn.com/papermap/6FYSF5TTvsKzeVI6/air/images/create-project.png?w=1100\u0026fit=max\u0026auto=format\u0026n=6FYSF5TTvsKzeVI6\u0026q=85\u0026s=0767b33dbfdf33cd5d01376285f4041a 1100w, https://mintcdn.com/papermap/6FYSF5TTvsKzeVI6/air/images/create-project.png?w=1650\u0026fit=max\u0026auto=format\u0026n=6FYSF5TTvsKzeVI6\u0026q=85\u0026s=9843aa8a65a56da89f4bed0859f76dc4 1650w, https://mintcdn.com/papermap/6FYSF5TTvsKzeVI6/air/images/create-project.png?w=2500\u0026fit=max\u0026auto=format\u0026n=6FYSF5TTvsKzeVI6\u0026q=85\u0026s=2f41e2cdacce11bc8da8a0a2a171d76b 2500w`})})]}),_jsxs(Step,{title:`Write the agent instructions`,id:`write-the-agent-instructions`,children:[_jsxs(_components.p,{children:[`Open `,_jsx(_components.strong,{children:`Prompts`}),`, select `,_jsx(_components.strong,{children:`New prompt`}),`, and name it `,_jsx(_components.code,{children:`Support assistant`}),`.\nOpen the prompt, select `,_jsx(_components.strong,{children:`New version`}),`, and enter:`]}),_jsx(CodeBlock,{filename:``,numberOfLines:`3`,language:`text`,children:_jsx(_components.pre,{className:`shiki shiki-themes github-light-default dark-plus`,style:{backgroundColor:`#ffffff`,\"--shiki-dark-bg\":`#0B0C0E`,color:`#1f2328`,\"--shiki-dark\":`#D4D4D4`},language:`text`,children:_jsxs(_components.code,{language:`text`,numberOfLines:`3`,children:[_jsx(_components.span,{className:`line`,children:_jsx(_components.span,{children:`You are a concise support assistant. Answer using the information in the`})}),`\n`,_jsx(_components.span,{className:`line`,children:_jsx(_components.span,{children:`run input. If information is missing, explain what you need.`})}),`\n`,_jsx(_components.span,{className:`line`,children:_jsx(_components.span,{})})]})})}),_jsx(_components.p,{children:`Add a short change note and create the version.`}),_jsx(Frame,{caption:`Prompt versions preserve the exact instructions used by each run.`,children:_jsx(OptimizedImage,{src:`https://mintcdn.com/papermap/6FYSF5TTvsKzeVI6/air/images/create-prompt-version.png?fit=max\u0026auto=format\u0026n=6FYSF5TTvsKzeVI6\u0026q=85\u0026s=ba57805b26980e3d733dc70d2c22ad4c`,alt:`AIR dialog for creating the first version of a support assistant prompt`,\"data-og-width\":`2880`,width:`2880`,\"data-og-height\":`1800`,height:`1800`,\"data-path\":`air/images/create-prompt-version.png`,\"data-optimize\":`true`,\"data-opv\":`3`,srcset:`https://mintcdn.com/papermap/6FYSF5TTvsKzeVI6/air/images/create-prompt-version.png?w=280\u0026fit=max\u0026auto=format\u0026n=6FYSF5TTvsKzeVI6\u0026q=85\u0026s=e8e7803ca354cf37343a218a11b638fa 280w, https://mintcdn.com/papermap/6FYSF5TTvsKzeVI6/air/images/create-prompt-version.png?w=560\u0026fit=max\u0026auto=format\u0026n=6FYSF5TTvsKzeVI6\u0026q=85\u0026s=bb90aeed128ea2f6e77fcf84bb324fab 560w, https://mintcdn.com/papermap/6FYSF5TTvsKzeVI6/air/images/create-prompt-version.png?w=840\u0026fit=max\u0026auto=format\u0026n=6FYSF5TTvsKzeVI6\u0026q=85\u0026s=69372da8a13a01d6fade2ab496de1294 840w, https://mintcdn.com/papermap/6FYSF5TTvsKzeVI6/air/images/create-prompt-version.png?w=1100\u0026fit=max\u0026auto=format\u0026n=6FYSF5TTvsKzeVI6\u0026q=85\u0026s=90ff23f9adb0940252d01e37999f9e46 1100w, https://mintcdn.com/papermap/6FYSF5TTvsKzeVI6/air/images/create-prompt-version.png?w=1650\u0026fit=max\u0026auto=format\u0026n=6FYSF5TTvsKzeVI6\u0026q=85\u0026s=89fcccfce19701e2c8141cd2511a9cb9 1650w, https://mintcdn.com/papermap/6FYSF5TTvsKzeVI6/air/images/create-prompt-version.png?w=2500\u0026fit=max\u0026auto=format\u0026n=6FYSF5TTvsKzeVI6\u0026q=85\u0026s=bbbcb9342d57bbfac21d0bdbab5c8675 2500w`})})]}),_jsxs(Step,{title:`Create and activate an agent`,id:`create-and-activate-an-agent`,children:[_jsxs(_components.p,{children:[`Open `,_jsx(_components.strong,{children:`Agents`}),`, select `,_jsx(_components.strong,{children:`New agent`}),`, and name it `,_jsx(_components.code,{children:`Support agent`}),`. Reuse the\nprompt version you just created.`]}),_jsxs(_components.p,{children:[`For the first staging smoke test, choose `,_jsx(_components.strong,{children:`Bring your own provider key`}),`,\nthen select `,_jsx(_components.strong,{children:`Testing`}),` and `,_jsx(_components.strong,{children:`fake-echo`}),`. This built-in model requires no\nkey. Leave `,_jsx(_components.strong,{children:`Activate immediately`}),` selected and choose `,_jsx(_components.strong,{children:`Create \u0026 start\nserving`}),`.`]}),_jsx(Frame,{caption:`An agent version binds one prompt version, model, allowed-tool set, and limits.`,children:_jsx(OptimizedImage,{src:`https://mintcdn.com/papermap/6FYSF5TTvsKzeVI6/air/images/configure-agent.png?fit=max\u0026auto=format\u0026n=6FYSF5TTvsKzeVI6\u0026q=85\u0026s=2d838ee07b33ec6b46264c8769dabaca`,alt:`AIR agent composer with the support prompt and fake-echo testing model selected`,\"data-og-width\":`2880`,width:`2880`,\"data-og-height\":`1800`,height:`1800`,\"data-path\":`air/images/configure-agent.png`,\"data-optimize\":`true`,\"data-opv\":`3`,srcset:`https://mintcdn.com/papermap/6FYSF5TTvsKzeVI6/air/images/configure-agent.png?w=280\u0026fit=max\u0026auto=format\u0026n=6FYSF5TTvsKzeVI6\u0026q=85\u0026s=702d885d9f37dfc7c143ccb42b1d99ec 280w, https://mintcdn.com/papermap/6FYSF5TTvsKzeVI6/air/images/configure-agent.png?w=560\u0026fit=max\u0026auto=format\u0026n=6FYSF5TTvsKzeVI6\u0026q=85\u0026s=b18e0d0b47da10911ab7bbf12e2a6cbe 560w, https://mintcdn.com/papermap/6FYSF5TTvsKzeVI6/air/images/configure-agent.png?w=840\u0026fit=max\u0026auto=format\u0026n=6FYSF5TTvsKzeVI6\u0026q=85\u0026s=d075c440081d29dbed9d8e939fb13378 840w, https://mintcdn.com/papermap/6FYSF5TTvsKzeVI6/air/images/configure-agent.png?w=1100\u0026fit=max\u0026auto=format\u0026n=6FYSF5TTvsKzeVI6\u0026q=85\u0026s=4cd19d02400bd442fad391bbc8c1e21c 1100w, https://mintcdn.com/papermap/6FYSF5TTvsKzeVI6/air/images/configure-agent.png?w=1650\u0026fit=max\u0026auto=format\u0026n=6FYSF5TTvsKzeVI6\u0026q=85\u0026s=db6eb4def4f8c1dd7448af8998bb6d2f 1650w, https://mintcdn.com/papermap/6FYSF5TTvsKzeVI6/air/images/configure-agent.png?w=2500\u0026fit=max\u0026auto=format\u0026n=6FYSF5TTvsKzeVI6\u0026q=85\u0026s=cc5f60590c4be98e43aa630ae641875d 2500w`})}),_jsx(Tip,{children:_jsx(_components.p,{children:`For real responses, choose OpenAI or Anthropic and connect the project\nprovider key when prompted. Keys are encrypted and never shown again.`})})]}),_jsxs(Step,{title:`Run the agent in the console`,id:`run-the-agent-in-the-console`,children:[_jsxs(_components.p,{children:[`In the agent’s `,_jsx(_components.strong,{children:`Try it`}),` panel, enter `,_jsx(_components.code,{children:`When does support open?`}),` and select\n`,_jsx(_components.strong,{children:`Run test`}),`. The `,_jsx(_components.strong,{children:`Output · streaming`}),` panel appears after the first model\nchunk and grows while the run is active. The transcript records the same\nevent sequence without changing the active configuration.`]}),_jsx(Frame,{caption:`The Try it panel is the fastest way to verify a new agent version.`,children:_jsx(OptimizedImage,{src:`https://mintcdn.com/papermap/6FYSF5TTvsKzeVI6/air/images/test-agent.png?fit=max\u0026auto=format\u0026n=6FYSF5TTvsKzeVI6\u0026q=85\u0026s=b65550bc4ba9fa5738c88f1b8ebb0ea4`,alt:`Active support agent with a succeeded test and visible transcript`,\"data-og-width\":`2880`,width:`2880`,\"data-og-height\":`1800`,height:`1800`,\"data-path\":`air/images/test-agent.png`,\"data-optimize\":`true`,\"data-opv\":`3`,srcset:`https://mintcdn.com/papermap/6FYSF5TTvsKzeVI6/air/images/test-agent.png?w=280\u0026fit=max\u0026auto=format\u0026n=6FYSF5TTvsKzeVI6\u0026q=85\u0026s=5bdca567bc6dde2dbd2db3e7f11e8eef 280w, https://mintcdn.com/papermap/6FYSF5TTvsKzeVI6/air/images/test-agent.png?w=560\u0026fit=max\u0026auto=format\u0026n=6FYSF5TTvsKzeVI6\u0026q=85\u0026s=f09737c7f0c331f902ef9abc8ef148f6 560w, https://mintcdn.com/papermap/6FYSF5TTvsKzeVI6/air/images/test-agent.png?w=840\u0026fit=max\u0026auto=format\u0026n=6FYSF5TTvsKzeVI6\u0026q=85\u0026s=cbb08b4c7423ab218da0bed82fd7ef39 840w, https://mintcdn.com/papermap/6FYSF5TTvsKzeVI6/air/images/test-agent.png?w=1100\u0026fit=max\u0026auto=format\u0026n=6FYSF5TTvsKzeVI6\u0026q=85\u0026s=ab7772e3c8b9c015c1de95369011d380 1100w, https://mintcdn.com/papermap/6FYSF5TTvsKzeVI6/air/images/test-agent.png?w=1650\u0026fit=max\u0026auto=format\u0026n=6FYSF5TTvsKzeVI6\u0026q=85\u0026s=11ab242d0484e7910b0f1b52452bbd72 1650w, https://mintcdn.com/papermap/6FYSF5TTvsKzeVI6/air/images/test-agent.png?w=2500\u0026fit=max\u0026auto=format\u0026n=6FYSF5TTvsKzeVI6\u0026q=85\u0026s=0cbeb0a6197eb70af53c67d5e9b3b8fb 2500w`})})]}),_jsxs(Step,{title:`Inspect the trace`,id:`inspect-the-trace`,children:[_jsxs(_components.p,{children:[`Select `,_jsx(_components.strong,{children:`Open full run`}),`. The trace shows the exact agent and prompt\nversions, token usage, cost, model latency, request, response, and immutable\nconfiguration snapshot.`]}),_jsx(Frame,{caption:`A successful run trace with timing, token usage, cost, and model output.`,children:_jsx(OptimizedImage,{src:`https://mintcdn.com/papermap/6FYSF5TTvsKzeVI6/air/images/run-trace.png?fit=max\u0026auto=format\u0026n=6FYSF5TTvsKzeVI6\u0026q=85\u0026s=e2721f2663b9d054aecacec88f394418`,alt:`AIR trace viewer showing a successful fake-echo model response`,\"data-og-width\":`2880`,width:`2880`,\"data-og-height\":`1800`,height:`1800`,\"data-path\":`air/images/run-trace.png`,\"data-optimize\":`true`,\"data-opv\":`3`,srcset:`https://mintcdn.com/papermap/6FYSF5TTvsKzeVI6/air/images/run-trace.png?w=280\u0026fit=max\u0026auto=format\u0026n=6FYSF5TTvsKzeVI6\u0026q=85\u0026s=4aa75e3289b8ef25eb1f83ae7efe6988 280w, https://mintcdn.com/papermap/6FYSF5TTvsKzeVI6/air/images/run-trace.png?w=560\u0026fit=max\u0026auto=format\u0026n=6FYSF5TTvsKzeVI6\u0026q=85\u0026s=f928fedd4746d69d19aea0bf6413de2f 560w, https://mintcdn.com/papermap/6FYSF5TTvsKzeVI6/air/images/run-trace.png?w=840\u0026fit=max\u0026auto=format\u0026n=6FYSF5TTvsKzeVI6\u0026q=85\u0026s=53ddecd96d78eeb33dea0a99b97736a4 840w, https://mintcdn.com/papermap/6FYSF5TTvsKzeVI6/air/images/run-trace.png?w=1100\u0026fit=max\u0026auto=format\u0026n=6FYSF5TTvsKzeVI6\u0026q=85\u0026s=df1839967878728e8442cead147e9d07 1100w, https://mintcdn.com/papermap/6FYSF5TTvsKzeVI6/air/images/run-trace.png?w=1650\u0026fit=max\u0026auto=format\u0026n=6FYSF5TTvsKzeVI6\u0026q=85\u0026s=199160c549202c9246bd6f66622e9aa3 1650w, https://mintcdn.com/papermap/6FYSF5TTvsKzeVI6/air/images/run-trace.png?w=2500\u0026fit=max\u0026auto=format\u0026n=6FYSF5TTvsKzeVI6\u0026q=85\u0026s=e5f53170054c069842f9fedb26e12919 2500w`})})]}),_jsxs(Step,{title:`Issue an app key`,id:`issue-an-app-key`,children:[_jsxs(_components.p,{children:[`Open `,_jsx(_components.strong,{children:`Settings`}),` and select `,_jsx(_components.strong,{children:`Issue app key`}),`. Copy the key once into your\nlocal environment or secret manager. Do not put it in source control.`]}),_jsx(Frame,{caption:`App keys create runs; worker keys register and execute private tools.`,children:_jsx(OptimizedImage,{src:`https://mintcdn.com/papermap/6FYSF5TTvsKzeVI6/air/images/project-keys.png?fit=max\u0026auto=format\u0026n=6FYSF5TTvsKzeVI6\u0026q=85\u0026s=3ad49dcce41c9d8e1ba75fbda5fa6d85`,alt:`AIR project settings showing app key and worker key actions`,\"data-og-width\":`2880`,width:`2880`,\"data-og-height\":`1800`,height:`1800`,\"data-path\":`air/images/project-keys.png`,\"data-optimize\":`true`,\"data-opv\":`3`,srcset:`https://mintcdn.com/papermap/6FYSF5TTvsKzeVI6/air/images/project-keys.png?w=280\u0026fit=max\u0026auto=format\u0026n=6FYSF5TTvsKzeVI6\u0026q=85\u0026s=93716428ad529706a37afd0a4cf06f36 280w, https://mintcdn.com/papermap/6FYSF5TTvsKzeVI6/air/images/project-keys.png?w=560\u0026fit=max\u0026auto=format\u0026n=6FYSF5TTvsKzeVI6\u0026q=85\u0026s=e09118038a610286b0d9991216a89fd1 560w, https://mintcdn.com/papermap/6FYSF5TTvsKzeVI6/air/images/project-keys.png?w=840\u0026fit=max\u0026auto=format\u0026n=6FYSF5TTvsKzeVI6\u0026q=85\u0026s=98b7bffd36aebc77f803d709cd2a2ed9 840w, https://mintcdn.com/papermap/6FYSF5TTvsKzeVI6/air/images/project-keys.png?w=1100\u0026fit=max\u0026auto=format\u0026n=6FYSF5TTvsKzeVI6\u0026q=85\u0026s=c392ecbdc956b22ce02e6729928b0925 1100w, https://mintcdn.com/papermap/6FYSF5TTvsKzeVI6/air/images/project-keys.png?w=1650\u0026fit=max\u0026auto=format\u0026n=6FYSF5TTvsKzeVI6\u0026q=85\u0026s=cc68fd41d5e02ebc9dd108e20a48febc 1650w, https://mintcdn.com/papermap/6FYSF5TTvsKzeVI6/air/images/project-keys.png?w=2500\u0026fit=max\u0026auto=format\u0026n=6FYSF5TTvsKzeVI6\u0026q=85\u0026s=c5bc2119819e8cc15c36c7592d72b460 2500w`})})]}),_jsxs(Step,{title:`Create the same run from Python`,id:`create-the-same-run-from-python`,children:[_jsx(_components.p,{children:`Install the published SDK:`}),_jsx(CodeBlock,{filename:``,numberOfLines:`3`,language:`shellscript`,children:_jsx(_components.pre,{className:`shiki shiki-themes github-light-default dark-plus`,style:{backgroundColor:`#ffffff`,\"--shiki-dark-bg\":`#0B0C0E`,color:`#1f2328`,\"--shiki-dark\":`#D4D4D4`},language:`shellscript`,children:_jsxs(_components.code,{language:`shellscript`,numberOfLines:`3`,children:[_jsxs(_components.span,{className:`line`,children:[_jsx(_components.span,{style:{color:`#953800`,\"--shiki-dark\":`#DCDCAA`},children:`python`}),_jsx(_components.span,{style:{color:`#0550AE`,\"--shiki-dark\":`#569CD6`},children:` -m`}),_jsx(_components.span,{style:{color:`#0A3069`,\"--shiki-dark\":`#CE9178`},children:` pip`}),_jsx(_components.span,{style:{color:`#0A3069`,\"--shiki-dark\":`#CE9178`},children:` install`}),_jsx(_components.span,{style:{color:`#0A3069`,\"--shiki-dark\":`#CE9178`},children:` papermap-air`})]}),`\n`,_jsxs(_components.span,{className:`line`,children:[_jsx(_components.span,{style:{color:`#CF222E`,\"--shiki-dark\":`#569CD6`},children:`export`}),_jsx(_components.span,{style:{color:`#1F2328`,\"--shiki-dark\":`#9CDCFE`},children:` AIR_BASE_URL`}),_jsx(_components.span,{style:{color:`#CF222E`,\"--shiki-dark\":`#D4D4D4`},children:`=`}),_jsx(_components.span,{style:{color:`#0A3069`,\"--shiki-dark\":`#CE9178`},children:`\"https://dev.airapi.papermap.ai\"`})]}),`\n`,_jsxs(_components.span,{className:`line`,children:[_jsx(_components.span,{style:{color:`#CF222E`,\"--shiki-dark\":`#569CD6`},children:`export`}),_jsx(_components.span,{style:{color:`#1F2328`,\"--shiki-dark\":`#9CDCFE`},children:` AIR_APP_KEY`}),_jsx(_components.span,{style:{color:`#CF222E`,\"--shiki-dark\":`#D4D4D4`},children:`=`}),_jsx(_components.span,{style:{color:`#0A3069`,\"--shiki-dark\":`#CE9178`},children:`\"\u003cyour-app-key>\"`})]}),`\n`]})})}),_jsxs(_components.p,{children:[`Copy the agent API ID from the agent page and use it as `,_jsx(_components.code,{children:`agent_id`}),`:`]}),_jsx(CodeBlock,{filename:``,numberOfLines:`21`,language:`python`,children:_jsx(_components.pre,{className:`shiki shiki-themes github-light-default dark-plus`,style:{backgroundColor:`#ffffff`,\"--shiki-dark-bg\":`#0B0C0E`,color:`#1f2328`,\"--shiki-dark\":`#D4D4D4`},language:`python`,children:_jsxs(_components.code,{language:`python`,numberOfLines:`21`,children:[_jsxs(_components.span,{className:`line`,children:[_jsx(_components.span,{style:{color:`#CF222E`,\"--shiki-dark\":`#C586C0`},children:`import`}),_jsx(_components.span,{style:{color:`#1F2328`,\"--shiki-dark\":`#D4D4D4`},children:` asyncio`})]}),`\n`,_jsxs(_components.span,{className:`line`,children:[_jsx(_components.span,{style:{color:`#CF222E`,\"--shiki-dark\":`#C586C0`},children:`import`}),_jsx(_components.span,{style:{color:`#1F2328`,\"--shiki-dark\":`#D4D4D4`},children:` os`})]}),`\n`,_jsx(_components.span,{className:`line`}),`\n`,_jsxs(_components.span,{className:`line`,children:[_jsx(_components.span,{style:{color:`#CF222E`,\"--shiki-dark\":`#C586C0`},children:`from`}),_jsx(_components.span,{style:{color:`#1F2328`,\"--shiki-dark\":`#D4D4D4`},children:` air `}),_jsx(_components.span,{style:{color:`#CF222E`,\"--shiki-dark\":`#C586C0`},children:`import`}),_jsx(_components.span,{style:{color:`#1F2328`,\"--shiki-dark\":`#D4D4D4`},children:` AirClient`})]}),`\n`,_jsx(_components.span,{className:`line`}),`\n`,_jsx(_components.span,{className:`line`}),`\n`,_jsxs(_components.span,{className:`line`,children:[_jsx(_components.span,{style:{color:`#CF222E`,\"--shiki-dark\":`#569CD6`},children:`async`}),_jsx(_components.span,{style:{color:`#CF222E`,\"--shiki-dark\":`#569CD6`},children:` def`}),_jsx(_components.span,{style:{color:`#8250DF`,\"--shiki-dark\":`#DCDCAA`},children:` main`}),_jsx(_components.span,{style:{color:`#1F2328`,\"--shiki-dark\":`#D4D4D4`},children:`() -> `}),_jsx(_components.span,{style:{color:`#0550AE`,\"--shiki-dark\":`#569CD6`},children:`None`}),_jsx(_components.span,{style:{color:`#1F2328`,\"--shiki-dark\":`#D4D4D4`},children:`:`})]}),`\n`,_jsxs(_components.span,{className:`line`,children:[_jsx(_components.span,{style:{color:`#CF222E`,\"--shiki-dark\":`#C586C0`},children:` async`}),_jsx(_components.span,{style:{color:`#CF222E`,\"--shiki-dark\":`#C586C0`},children:` with`}),_jsx(_components.span,{style:{color:`#1F2328`,\"--shiki-dark\":`#D4D4D4`},children:` AirClient(`})]}),`\n`,_jsxs(_components.span,{className:`line`,children:[_jsx(_components.span,{style:{color:`#1F2328`,\"--shiki-dark\":`#D4D4D4`},children:` os.environ[`}),_jsx(_components.span,{style:{color:`#0A3069`,\"--shiki-dark\":`#CE9178`},children:`\"AIR_BASE_URL\"`}),_jsx(_components.span,{style:{color:`#1F2328`,\"--shiki-dark\":`#D4D4D4`},children:`],`})]}),`\n`,_jsxs(_components.span,{className:`line`,children:[_jsx(_components.span,{style:{color:`#1F2328`,\"--shiki-dark\":`#D4D4D4`},children:` os.environ[`}),_jsx(_components.span,{style:{color:`#0A3069`,\"--shiki-dark\":`#CE9178`},children:`\"AIR_APP_KEY\"`}),_jsx(_components.span,{style:{color:`#1F2328`,\"--shiki-dark\":`#D4D4D4`},children:`],`})]}),`\n`,_jsxs(_components.span,{className:`line`,children:[_jsx(_components.span,{style:{color:`#1F2328`,\"--shiki-dark\":`#D4D4D4`},children:` ) `}),_jsx(_components.span,{style:{color:`#CF222E`,\"--shiki-dark\":`#C586C0`},children:`as`}),_jsx(_components.span,{style:{color:`#1F2328`,\"--shiki-dark\":`#D4D4D4`},children:` client:`})]}),`\n`,_jsxs(_components.span,{className:`line`,children:[_jsx(_components.span,{style:{color:`#1F2328`,\"--shiki-dark\":`#D4D4D4`},children:` run `}),_jsx(_components.span,{style:{color:`#CF222E`,\"--shiki-dark\":`#D4D4D4`},children:`=`}),_jsx(_components.span,{style:{color:`#CF222E`,\"--shiki-dark\":`#C586C0`},children:` await`}),_jsx(_components.span,{style:{color:`#1F2328`,\"--shiki-dark\":`#D4D4D4`},children:` client.runs.create(`})]}),`\n`,_jsxs(_components.span,{className:`line`,children:[_jsx(_components.span,{style:{color:`#953800`,\"--shiki-dark\":`#9CDCFE`},children:` agent_id`}),_jsx(_components.span,{style:{color:`#CF222E`,\"--shiki-dark\":`#D4D4D4`},children:`=`}),_jsx(_components.span,{style:{color:`#0A3069`,\"--shiki-dark\":`#CE9178`},children:`\"support-agent\"`}),_jsx(_components.span,{style:{color:`#1F2328`,\"--shiki-dark\":`#D4D4D4`},children:`,`})]}),`\n`,_jsxs(_components.span,{className:`line`,children:[_jsx(_components.span,{style:{color:`#953800`,\"--shiki-dark\":`#9CDCFE`},children:` input`}),_jsx(_components.span,{style:{color:`#CF222E`,\"--shiki-dark\":`#D4D4D4`},children:`=`}),_jsx(_components.span,{style:{color:`#1F2328`,\"--shiki-dark\":`#D4D4D4`},children:`{`}),_jsx(_components.span,{style:{color:`#0A3069`,\"--shiki-dark\":`#CE9178`},children:`\"message\"`}),_jsx(_components.span,{style:{color:`#1F2328`,\"--shiki-dark\":`#D4D4D4`},children:`: `}),_jsx(_components.span,{style:{color:`#0A3069`,\"--shiki-dark\":`#CE9178`},children:`\"When does support open?\"`}),_jsx(_components.span,{style:{color:`#1F2328`,\"--shiki-dark\":`#D4D4D4`},children:`},`})]}),`\n`,_jsxs(_components.span,{className:`line`,children:[_jsx(_components.span,{style:{color:`#953800`,\"--shiki-dark\":`#9CDCFE`},children:` context`}),_jsx(_components.span,{style:{color:`#CF222E`,\"--shiki-dark\":`#D4D4D4`},children:`=`}),_jsx(_components.span,{style:{color:`#1F2328`,\"--shiki-dark\":`#D4D4D4`},children:`{`}),_jsx(_components.span,{style:{color:`#0A3069`,\"--shiki-dark\":`#CE9178`},children:`\"tenant_id\"`}),_jsx(_components.span,{style:{color:`#1F2328`,\"--shiki-dark\":`#D4D4D4`},children:`: `}),_jsx(_components.span,{style:{color:`#0A3069`,\"--shiki-dark\":`#CE9178`},children:`\"demo\"`}),_jsx(_components.span,{style:{color:`#1F2328`,\"--shiki-dark\":`#D4D4D4`},children:`},`})]}),`\n`,_jsx(_components.span,{className:`line`,children:_jsx(_components.span,{style:{color:`#1F2328`,\"--shiki-dark\":`#D4D4D4`},children:` )`})}),`\n`,_jsxs(_components.span,{className:`line`,children:[_jsx(_components.span,{style:{color:`#1F2328`,\"--shiki-dark\":`#D4D4D4`},children:` result `}),_jsx(_components.span,{style:{color:`#CF222E`,\"--shiki-dark\":`#D4D4D4`},children:`=`}),_jsx(_components.span,{style:{color:`#CF222E`,\"--shiki-dark\":`#C586C0`},children:` await`}),_jsx(_components.span,{style:{color:`#1F2328`,\"--shiki-dark\":`#D4D4D4`},children:` client.runs.wait(run.id, `}),_jsx(_components.span,{style:{color:`#953800`,\"--shiki-dark\":`#9CDCFE`},children:`timeout`}),_jsx(_components.span,{style:{color:`#CF222E`,\"--shiki-dark\":`#D4D4D4`},children:`=`}),_jsx(_components.span,{style:{color:`#0550AE`,\"--shiki-dark\":`#B5CEA8`},children:`120`}),_jsx(_components.span,{style:{color:`#1F2328`,\"--shiki-dark\":`#D4D4D4`},children:`)`})]}),`\n`,_jsxs(_components.span,{className:`line`,children:[_jsx(_components.span,{style:{color:`#0550AE`,\"--shiki-dark\":`#DCDCAA`},children:` print`}),_jsx(_components.span,{style:{color:`#1F2328`,\"--shiki-dark\":`#D4D4D4`},children:`(result.status, result.output)`})]}),`\n`,_jsx(_components.span,{className:`line`}),`\n`,_jsx(_components.span,{className:`line`}),`\n`,_jsx(_components.span,{className:`line`,children:_jsx(_components.span,{style:{color:`#1F2328`,\"--shiki-dark\":`#D4D4D4`},children:`asyncio.run(main())`})}),`\n`]})})})]})]}),`\n`,_jsxs(_components.p,{children:[`You now have a project, versioned instructions, an active agent, a successful\ntrace, and application access. Next, `,_jsx(_components.a,{href:`/air/workers/create-worker`,children:`connect a private worker`}),`.`]})]})}function MDXContent(props={}){const{wrapper:MDXLayout}={..._provideComponents(),...props.components};return MDXLayout?_jsx(MDXLayout,{...props,children:_jsx(_createMdxContent,{...props})}):_createMdxContent(props)}return{default:MDXContent};function _missingMdxReference(id,component){throw new Error(`Expected `+(component?`component`:`object`)+\" `\"+id+\"` to be defined: you likely forgot to import, pass, or provide it.\")}","frontmatter":{},"scope":{"config":{},"pageMetadata":{"title":"Visual quickstart","sidebarTitle":"Quickstart","description":"Create a project, prompt, active agent, and first run in the AIR staging console.","icon":"rocket","href":"/air/quickstart"}}},"mdxSourceWithNoJs":null},"mdxExtracts":{"tableOfContents":[{"title":"Before you begin","slug":"before-you-begin","depth":2,"children":[]},{"title":"Create a project","slug":"create-a-project","depth":2,"children":[]},{"title":"Write the agent instructions","slug":"write-the-agent-instructions","depth":2,"children":[]},{"title":"Create and activate an agent","slug":"create-and-activate-an-agent","depth":2,"children":[]},{"title":"Run the agent in the console","slug":"run-the-agent-in-the-console","depth":2,"children":[]},{"title":"Inspect the trace","slug":"inspect-the-trace","depth":2,"children":[]},{"title":"Issue an app key","slug":"issue-an-app-key","depth":2,"children":[]},{"title":"Create the same run from Python","slug":"create-the-same-run-from-python","depth":2,"children":[]}],"codeExamples":{}},"jsLinks":[],"subdomain":"papermap","siteName":"Papermap","title":"Visual quickstart - Papermap","navMaps":{"firstHrefInVersion":{},"firstHrefInLanguage":{}},"lastModified":"2026-07-15T18:56:47.831Z","originalFileLocation":"air/quickstart.mdx"},"headHtml":"\u003cscript data-mint-head>(function(){var d=document.documentElement,p=null;if(!p){try{p=localStorage.getItem(\"isDarkMode\")}catch(e){}if(p==='true')p='dark';else if(p==='false')p='light';if(p!=='light'\u0026\u0026p!=='dark'\u0026\u0026p!=='system')p=\"system\"}var r=p==='system'?(matchMedia(\"(prefers-color-scheme: dark)\").matches?'dark':'light'):p;d.classList.remove(r==='dark'?'light':'dark');d.classList.add(r);d.setAttribute(\"data-theme-preference\",p)})();\u003c/script>\u003cmeta data-mint-head name=\"description\" content=\"Create a project, prompt, active agent, and first run in the AIR staging console.\">\u003cmeta data-mint-head name=\"application-name\" content=\"Papermap\">\u003cmeta data-mint-head name=\"generator\" content=\"Mintlify\">\u003clink data-mint-head rel=\"icon\" type=\"image/png\" sizes=\"192x192\" href=\"/mintlify-assets/_mintlify/favicons/papermap/FPEoIUb7lWB8Iajh/_generated/favicon/android-chrome-192x192.png\" media=\"(prefers-color-scheme: light)\">\u003clink data-mint-head rel=\"apple-touch-icon\" type=\"image/png\" sizes=\"180x180\" href=\"/mintlify-assets/_mintlify/favicons/papermap/FPEoIUb7lWB8Iajh/_generated/favicon/apple-touch-icon.png\">\u003clink data-mint-head rel=\"icon\" type=\"image/png\" sizes=\"16x16\" href=\"/mintlify-assets/_mintlify/favicons/papermap/FPEoIUb7lWB8Iajh/_generated/favicon/favicon-16x16.png\" media=\"(prefers-color-scheme: light)\">\u003clink data-mint-head rel=\"icon\" type=\"image/png\" sizes=\"32x32\" href=\"/mintlify-assets/_mintlify/favicons/papermap/FPEoIUb7lWB8Iajh/_generated/favicon/favicon-32x32.png\" media=\"(prefers-color-scheme: light)\">\u003clink data-mint-head rel=\"shortcut icon\" type=\"image/x-icon\" href=\"/mintlify-assets/_mintlify/favicons/papermap/FPEoIUb7lWB8Iajh/_generated/favicon/favicon.ico\" media=\"(prefers-color-scheme: light)\">\u003clink data-mint-head rel=\"icon\" type=\"image/png\" sizes=\"192x192\" href=\"/mintlify-assets/_mintlify/favicons/papermap/FPEoIUb7lWB8Iajh/_generated/favicon-dark/android-chrome-192x192.png\" media=\"(prefers-color-scheme: dark)\">\u003clink data-mint-head rel=\"icon\" type=\"image/png\" sizes=\"16x16\" href=\"/mintlify-assets/_mintlify/favicons/papermap/FPEoIUb7lWB8Iajh/_generated/favicon-dark/favicon-16x16.png\" media=\"(prefers-color-scheme: dark)\">\u003clink data-mint-head rel=\"icon\" type=\"image/png\" sizes=\"32x32\" href=\"/mintlify-assets/_mintlify/favicons/papermap/FPEoIUb7lWB8Iajh/_generated/favicon-dark/favicon-32x32.png\" media=\"(prefers-color-scheme: dark)\">\u003clink data-mint-head rel=\"shortcut icon\" type=\"image/x-icon\" href=\"/mintlify-assets/_mintlify/favicons/papermap/FPEoIUb7lWB8Iajh/_generated/favicon-dark/favicon.ico\" media=\"(prefers-color-scheme: dark)\">\u003cmeta data-mint-head property=\"og:title\" content=\"Visual quickstart - Papermap\">\u003cmeta data-mint-head property=\"og:description\" content=\"Create a project, prompt, active agent, and first run in the AIR staging console.\">\u003cmeta data-mint-head property=\"og:site_name\" content=\"Papermap\">\u003cmeta data-mint-head property=\"og:url\" content=\"https://docs.papermap.ai/air/quickstart\">\u003cmeta data-mint-head property=\"og:type\" content=\"website\">\u003cmeta data-mint-head property=\"og:image\" content=\"https://papermap.mintlify.app/_mintlify/api/og/v2?division=Start+here\u0026amp;title=Visual+quickstart\u0026amp;description=Create+a+project%2C+prompt%2C+active+agent%2C+and+first+run+in+the+AIR+staging+console.\u0026amp;theme=a7e1f4a409916cd117b22aae\u0026amp;signature=38435c0414cfc8e604d7849bff688c89dae48f00f77683f4d09dca168b0a658d\">\u003cmeta data-mint-head property=\"og:image:width\" content=\"1200\">\u003cmeta data-mint-head property=\"og:image:height\" content=\"630\">\u003cmeta data-mint-head name=\"twitter:card\" content=\"summary_large_image\">\u003cmeta data-mint-head name=\"twitter:title\" content=\"Visual quickstart - Papermap\">\u003cmeta data-mint-head name=\"twitter:description\" content=\"Create a project, prompt, active agent, and first run in the AIR staging console.\">\u003cmeta data-mint-head name=\"twitter:image\" content=\"https://papermap.mintlify.app/_mintlify/api/og/v2?division=Start+here\u0026amp;title=Visual+quickstart\u0026amp;description=Create+a+project%2C+prompt%2C+active+agent%2C+and+first+run+in+the+AIR+staging+console.\u0026amp;theme=a7e1f4a409916cd117b22aae\u0026amp;signature=38435c0414cfc8e604d7849bff688c89dae48f00f77683f4d09dca168b0a658d\">\u003cmeta data-mint-head name=\"twitter:image:width\" content=\"1200\">\u003cmeta data-mint-head name=\"twitter:image:height\" content=\"630\">\u003cmeta data-mint-head name=\"msapplication-config\" content=\"/mintlify-assets/_mintlify/favicons/papermap/FPEoIUb7lWB8Iajh/_generated/favicon/browserconfig.xml\">\u003cmeta data-mint-head name=\"apple-mobile-web-app-title\" content=\"Papermap\">\u003cmeta data-mint-head name=\"msapplication-TileColor\" content=\"#16A34A\">\u003clink data-mint-head rel=\"canonical\" href=\"https://docs.papermap.ai/air/quickstart\">\u003clink data-mint-head rel=\"alternate\" type=\"application/xml\" href=\"/sitemap.xml\">\u003clink data-mint-head rel=\"alternate\" type=\"text/markdown\" href=\"/air/quickstart.md\">\u003cscript data-mint-head type=\"application/ld+json\">{\"@context\":\"https://schema.org\",\"@graph\":[{\"@type\":\"Organization\",\"@id\":\"https://docs.papermap.ai/#organization\",\"name\":\"Papermap\",\"url\":\"https://docs.papermap.ai\",\"logo\":{\"@type\":\"ImageObject\",\"url\":\"https://mintcdn.com/papermap/8hXnlJ8qeTMpHWXU/logo/light.png?fit=max\u0026auto=format\u0026n=8hXnlJ8qeTMpHWXU\u0026q=85\u0026s=a982bbb381d342be222ed1a362cb948b\"}},{\"@type\":\"WebSite\",\"@id\":\"https://docs.papermap.ai#website\",\"name\":\"Papermap\",\"url\":\"https://docs.papermap.ai\",\"publisher\":{\"@id\":\"https://docs.papermap.ai/#organization\"}},{\"@type\":\"WebPage\",\"@id\":\"https://docs.papermap.ai/air/quickstart#webpage\",\"url\":\"https://docs.papermap.ai/air/quickstart\",\"name\":\"Visual quickstart\",\"description\":\"Create a project, prompt, active agent, and first run in the AIR staging console.\",\"dateModified\":\"2026-07-15T18:56:47.831Z\",\"isPartOf\":{\"@id\":\"https://docs.papermap.ai#website\"},\"breadcrumb\":{\"@id\":\"https://docs.papermap.ai/air/quickstart#breadcrumb\"}},{\"@type\":\"BreadcrumbList\",\"@id\":\"https://docs.papermap.ai/air/quickstart#breadcrumb\",\"itemListElement\":[{\"@type\":\"ListItem\",\"position\":1,\"name\":\"Start here\",\"item\":\"https://docs.papermap.ai/air/index\"},{\"@type\":\"ListItem\",\"position\":2,\"name\":\"Visual quickstart\",\"item\":\"https://docs.papermap.ai/air/quickstart\"}]},{\"@type\":[\"Article\",\"TechArticle\"],\"@id\":\"https://docs.papermap.ai/air/quickstart#article\",\"headline\":\"Visual quickstart\",\"name\":\"Visual quickstart\",\"description\":\"Create a project, prompt, active agent, and first run in the AIR staging console.\",\"url\":\"https://docs.papermap.ai/air/quickstart\",\"mainEntityOfPage\":{\"@id\":\"https://docs.papermap.ai/air/quickstart#webpage\"},\"dateModified\":\"2026-07-15T18:56:47.831Z\",\"publisher\":{\"@id\":\"https://docs.papermap.ai/#organization\"},\"isPartOf\":{\"@id\":\"https://docs.papermap.ai#website\"}}]}\u003c/script>\u003cscript data-mint-head type=\"application/ld+json\">{\"@context\":\"https://schema.org\",\"@type\":\"WebSite\",\"name\":\"Papermap\",\"creator\":{\"@type\":\"Organization\",\"name\":\"Mintlify\",\"url\":\"https://mintlify.com\"}}\u003c/script>","siteName":"Papermap","nav":{"global":{"anchors":[{"anchor":"Your Workspaces","icon":"book-open-cover","href":"https://www.papermap.ai/auth/login"}]},"tabs":[{"tab":"Documentation","icon":"book","pages":[{"title":"Documentation","href":""}]},{"tab":"AIR","icon":"send","groups":[{"group":"Start here","pages":[{"title":"Papermap AIR","description":"Build governed AI agents and connect private tools without opening your infrastructure to inbound traffic.","icon":"bot","href":"/air"},{"title":"Visual quickstart","sidebarTitle":"Quickstart","icon":"rocket","href":"/air/quickstart"},{"title":"How AIR works","description":"Understand projects, agents, runs, workers, tools, and the durable execution loop.","icon":"diagram-project","href":"/air/concepts/how-air-works"},{"title":"Projects and keys","icon":"key","href":"/air/concepts/projects-and-keys"}]},{"group":"Build agents and apps","pages":[{"title":"Create and version an agent","sidebarTitle":"Create an agent","icon":"bot","href":"/air/agents/create-agent"},{"title":"Create and manage runs","sidebarTitle":"Create runs","icon":"play","href":"/air/applications/create-runs"}]},{"group":"Connect private tools","pages":[{"title":"Create a private worker","sidebarTitle":"Create a worker","icon":"server","href":"/air/workers/create-worker"},{"title":"Deploy a worker","icon":"container-storage","href":"/air/workers/deploy-worker"},{"title":"Connect MCP tools","icon":"plug","href":"/air/workers/mcp"}]},{"group":"Operate safely","pages":[{"title":"Security","icon":"shield-check","href":"/air/guides/security"},{"title":"Troubleshooting","icon":"wrench","href":"/air/guides/troubleshooting"}]},{"group":"SDK reference","pages":[{"title":"Python SDK","icon":"python","href":"/air/reference/python-sdk"},{"title":"Environment variables","icon":"rectangle-terminal","href":"/air/reference/environment-variables"}]}]},{"tab":"Features","icon":"sparkles","pages":[{"title":"Features","href":"/features/overview"}]},{"tab":"API Reference","icon":"code","pages":[{"title":"API Reference","href":"/api-reference/generate-embed-token"}]},{"tab":"Changelog","icon":"list","pages":[{"title":"Changelog","href":"/changelog/release-notes"}]}]},"title":"Visual quickstart - Papermap","buildId":"dpl_9DauxEjb9gzCtcuhPQFbquJvx7FJ","deploymentId":"dpl_9DauxEjb9gzCtcuhPQFbquJvx7FJ","dynamics":["07c022d89b","a74be98ba7"],"chunks":["Frame-DpBmNN95.js","DynamicMarkdown-BY_qDhTn.js","zoom-image-lightbox-D4WcYaf4.js","PlusIcon-CwhPVjTe.js","lightbox-handle-r17bVUz3.js"]}