> ## Documentation Index
> Fetch the complete documentation index at: https://docs.papermap.ai/llms.txt
> Use this file to discover all available pages before exploring further.
# Multi-Tenancy Setup
Step-by-step guide to configure multi-tenancy in your Papermap workspace, including tenant table selection and API key generation. This guide walks you through configuring multi-tenancy in your Papermap workspace. Follow these steps to set up tenant isolation and data access controls.
## Prerequisites
Before you begin, ensure you have:
* A Papermap account with workspace access
* Connected data sources with tenant-identifiable tables
* Administrative permissions in your workspace
## Configuration Steps
### Step 1: Access Workspace Settings
Navigate to [papermap.ai](https://www.papermap.ai) and sign in with your credentials.
Select the workspace where you want to enable multi-tenancy.
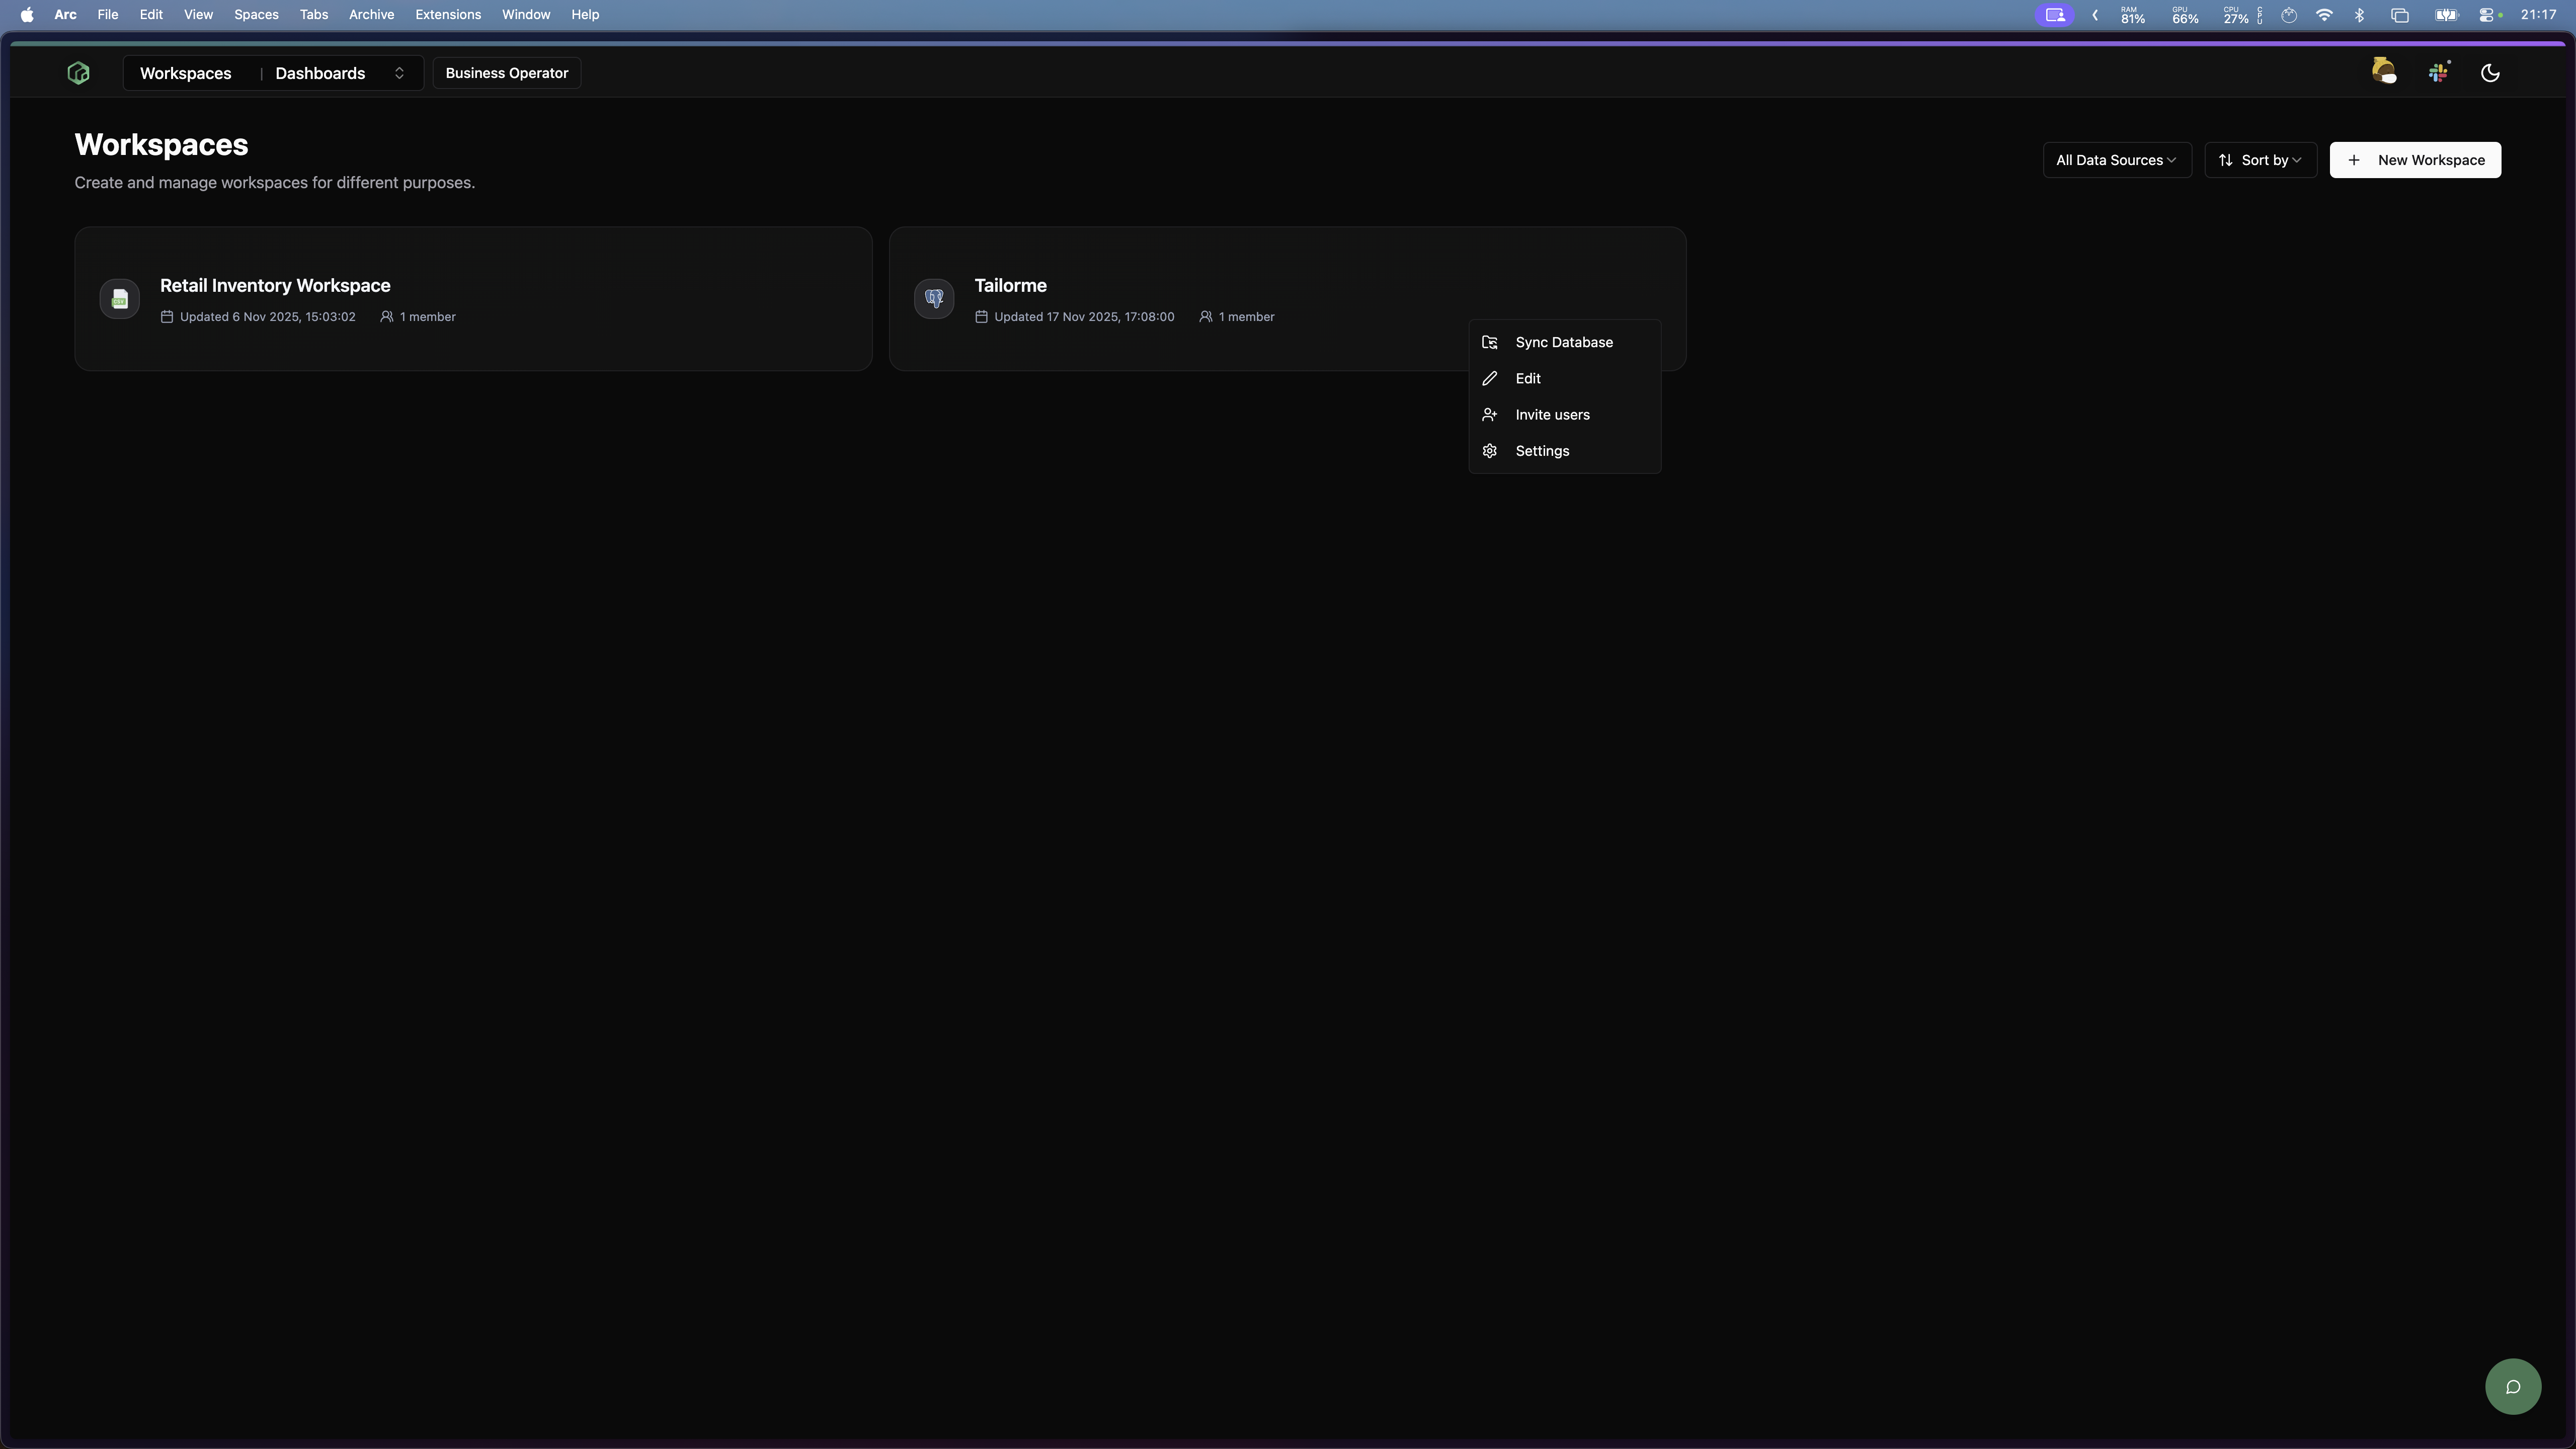
Click on **Settings** in the drop-down options on the workspace card to access workspace configuration.
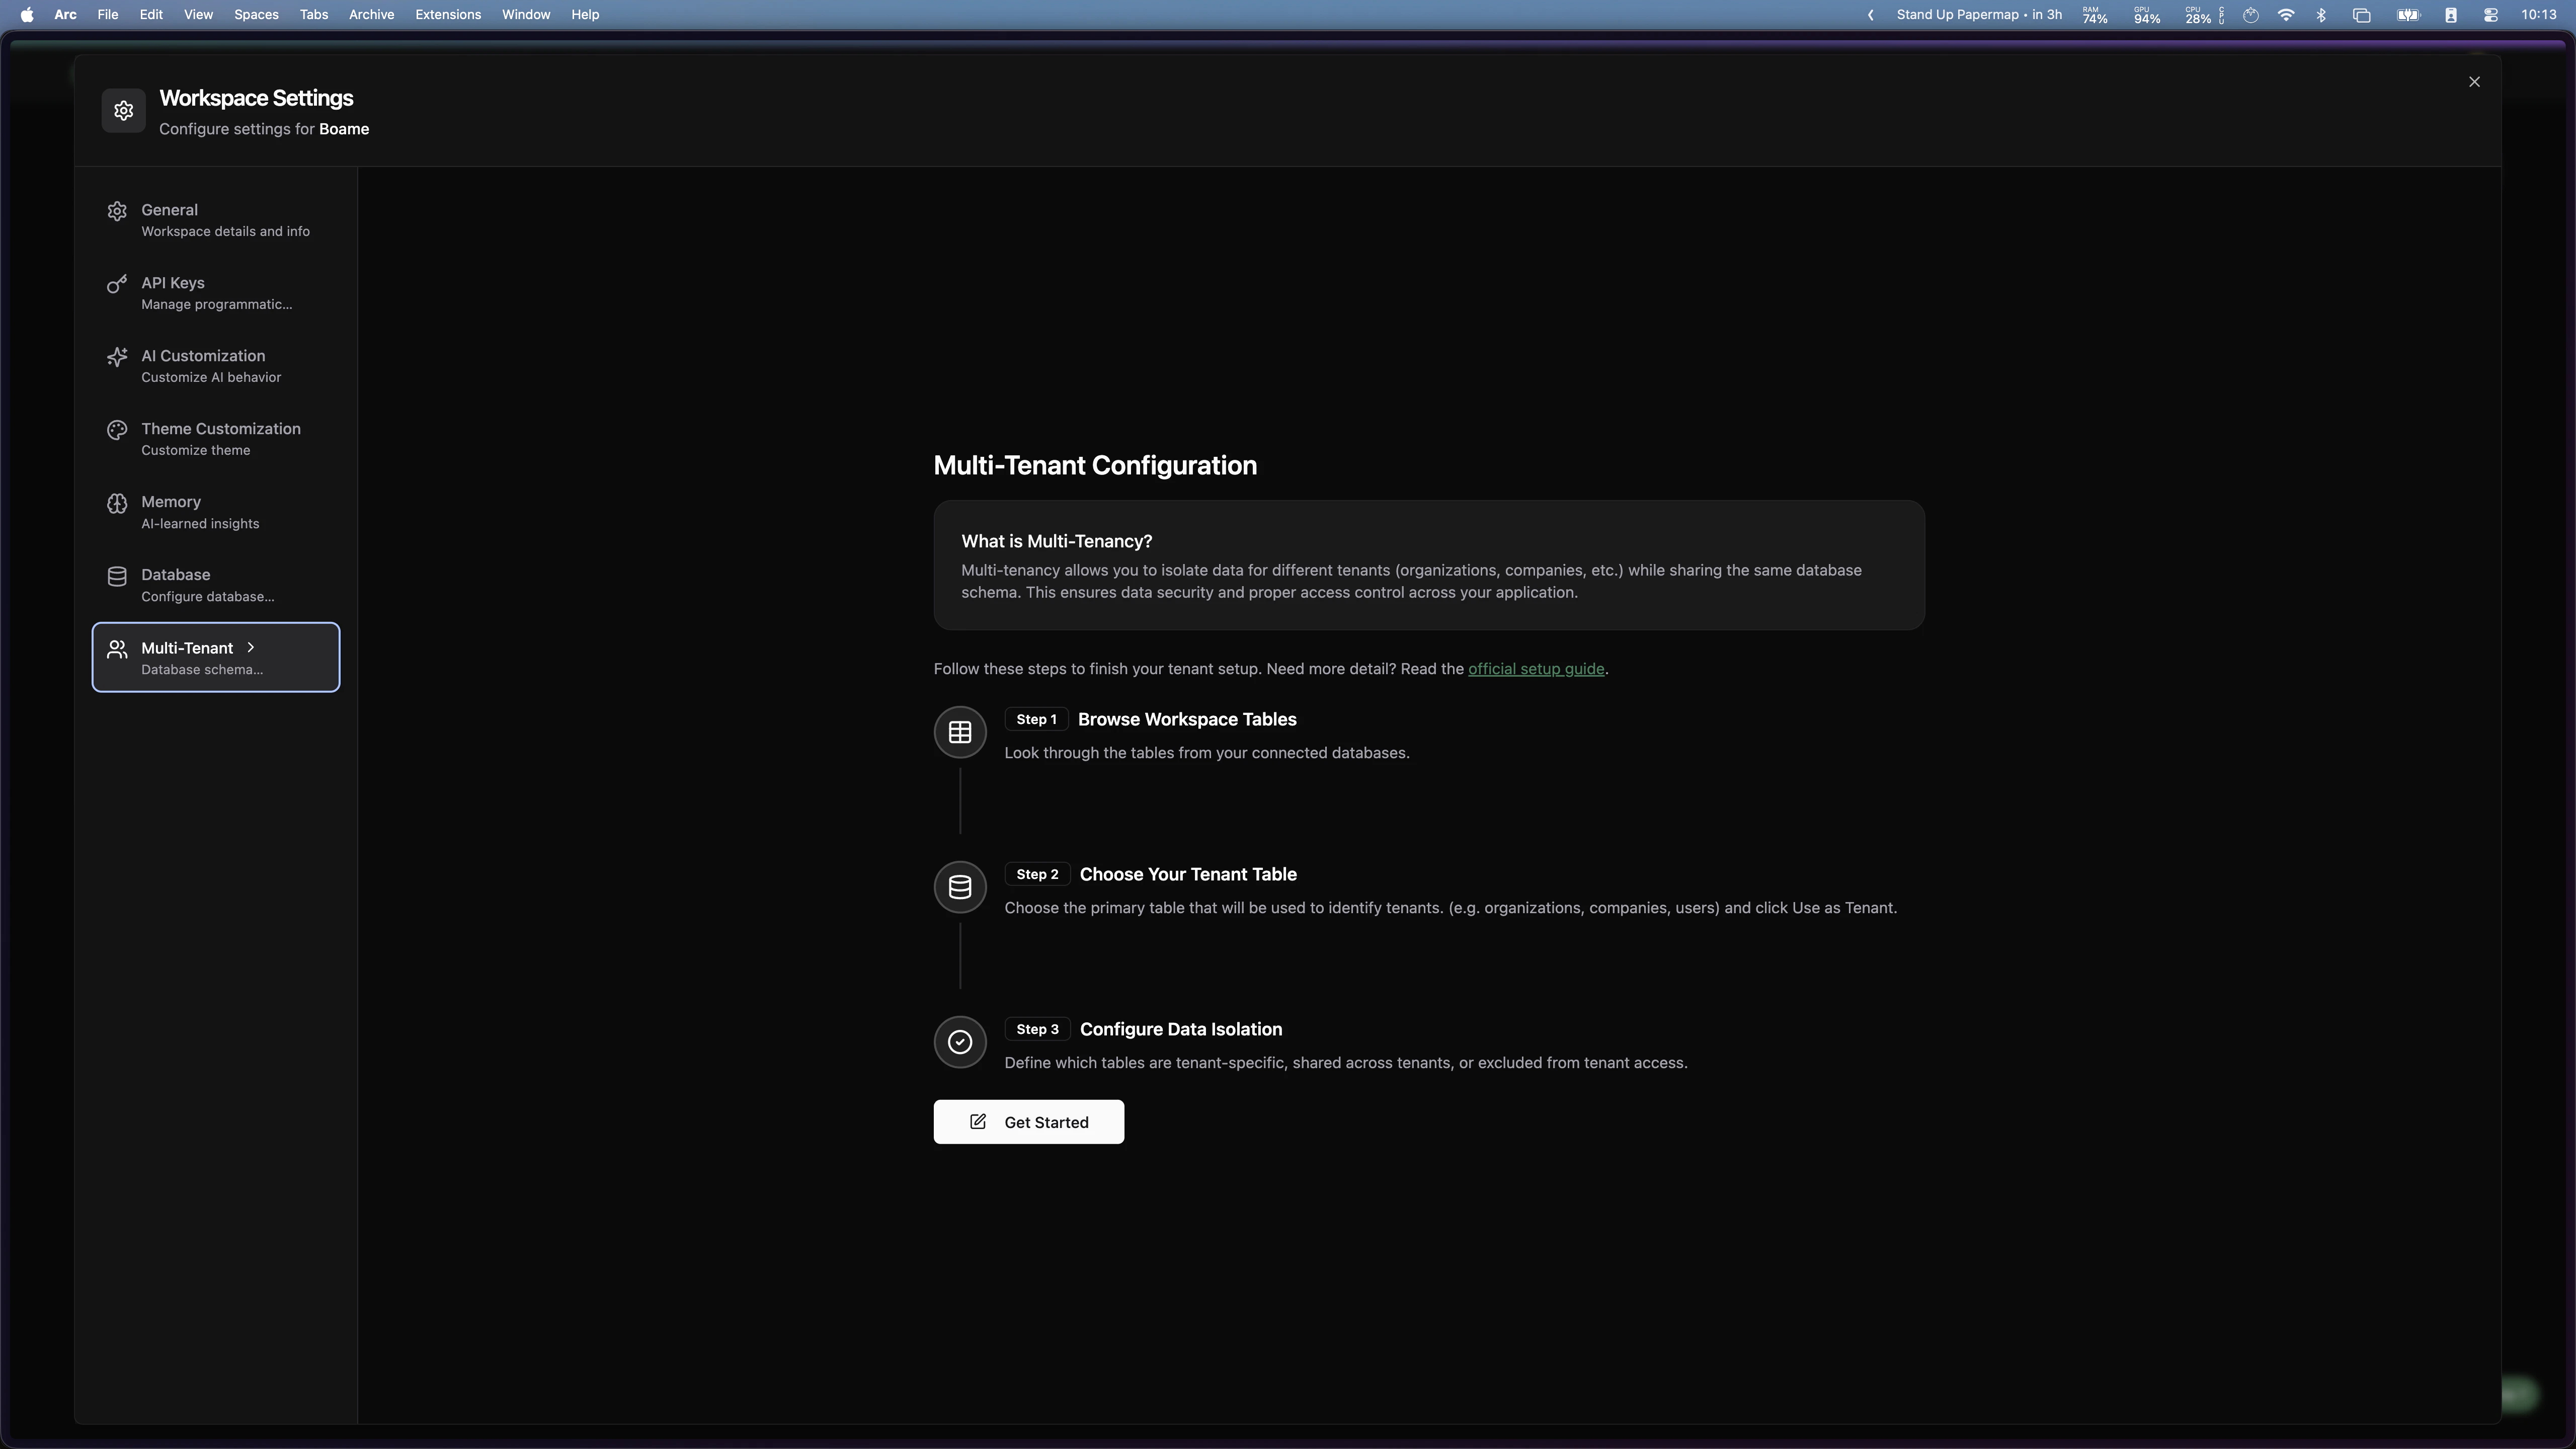
 In the settings editor, find **Multi-Tenant** on the sidebar and click it to open the configuration page and then click the **Get Started** button.
 ### Step 2: Select Your Tenant Table
The tenant table is the core table that identifies and separates your different tenants. This could be a `customers`, `organizations`, or `users` table - depending on your data model.
In the Multi-Tenant configuration page, you'll see a list of available tables from your connected data sources.
Find the table you want to use as your tenant identifier (e.g., `customers`, `organizations`, `users`).
Click **Use as Tenant** on your chosen table.
### Step 2: Select Your Tenant Table
The tenant table is the core table that identifies and separates your different tenants. This could be a `customers`, `organizations`, or `users` table - depending on your data model.
In the Multi-Tenant configuration page, you'll see a list of available tables from your connected data sources.
Find the table you want to use as your tenant identifier (e.g., `customers`, `organizations`, `users`).
Click **Use as Tenant** on your chosen table.
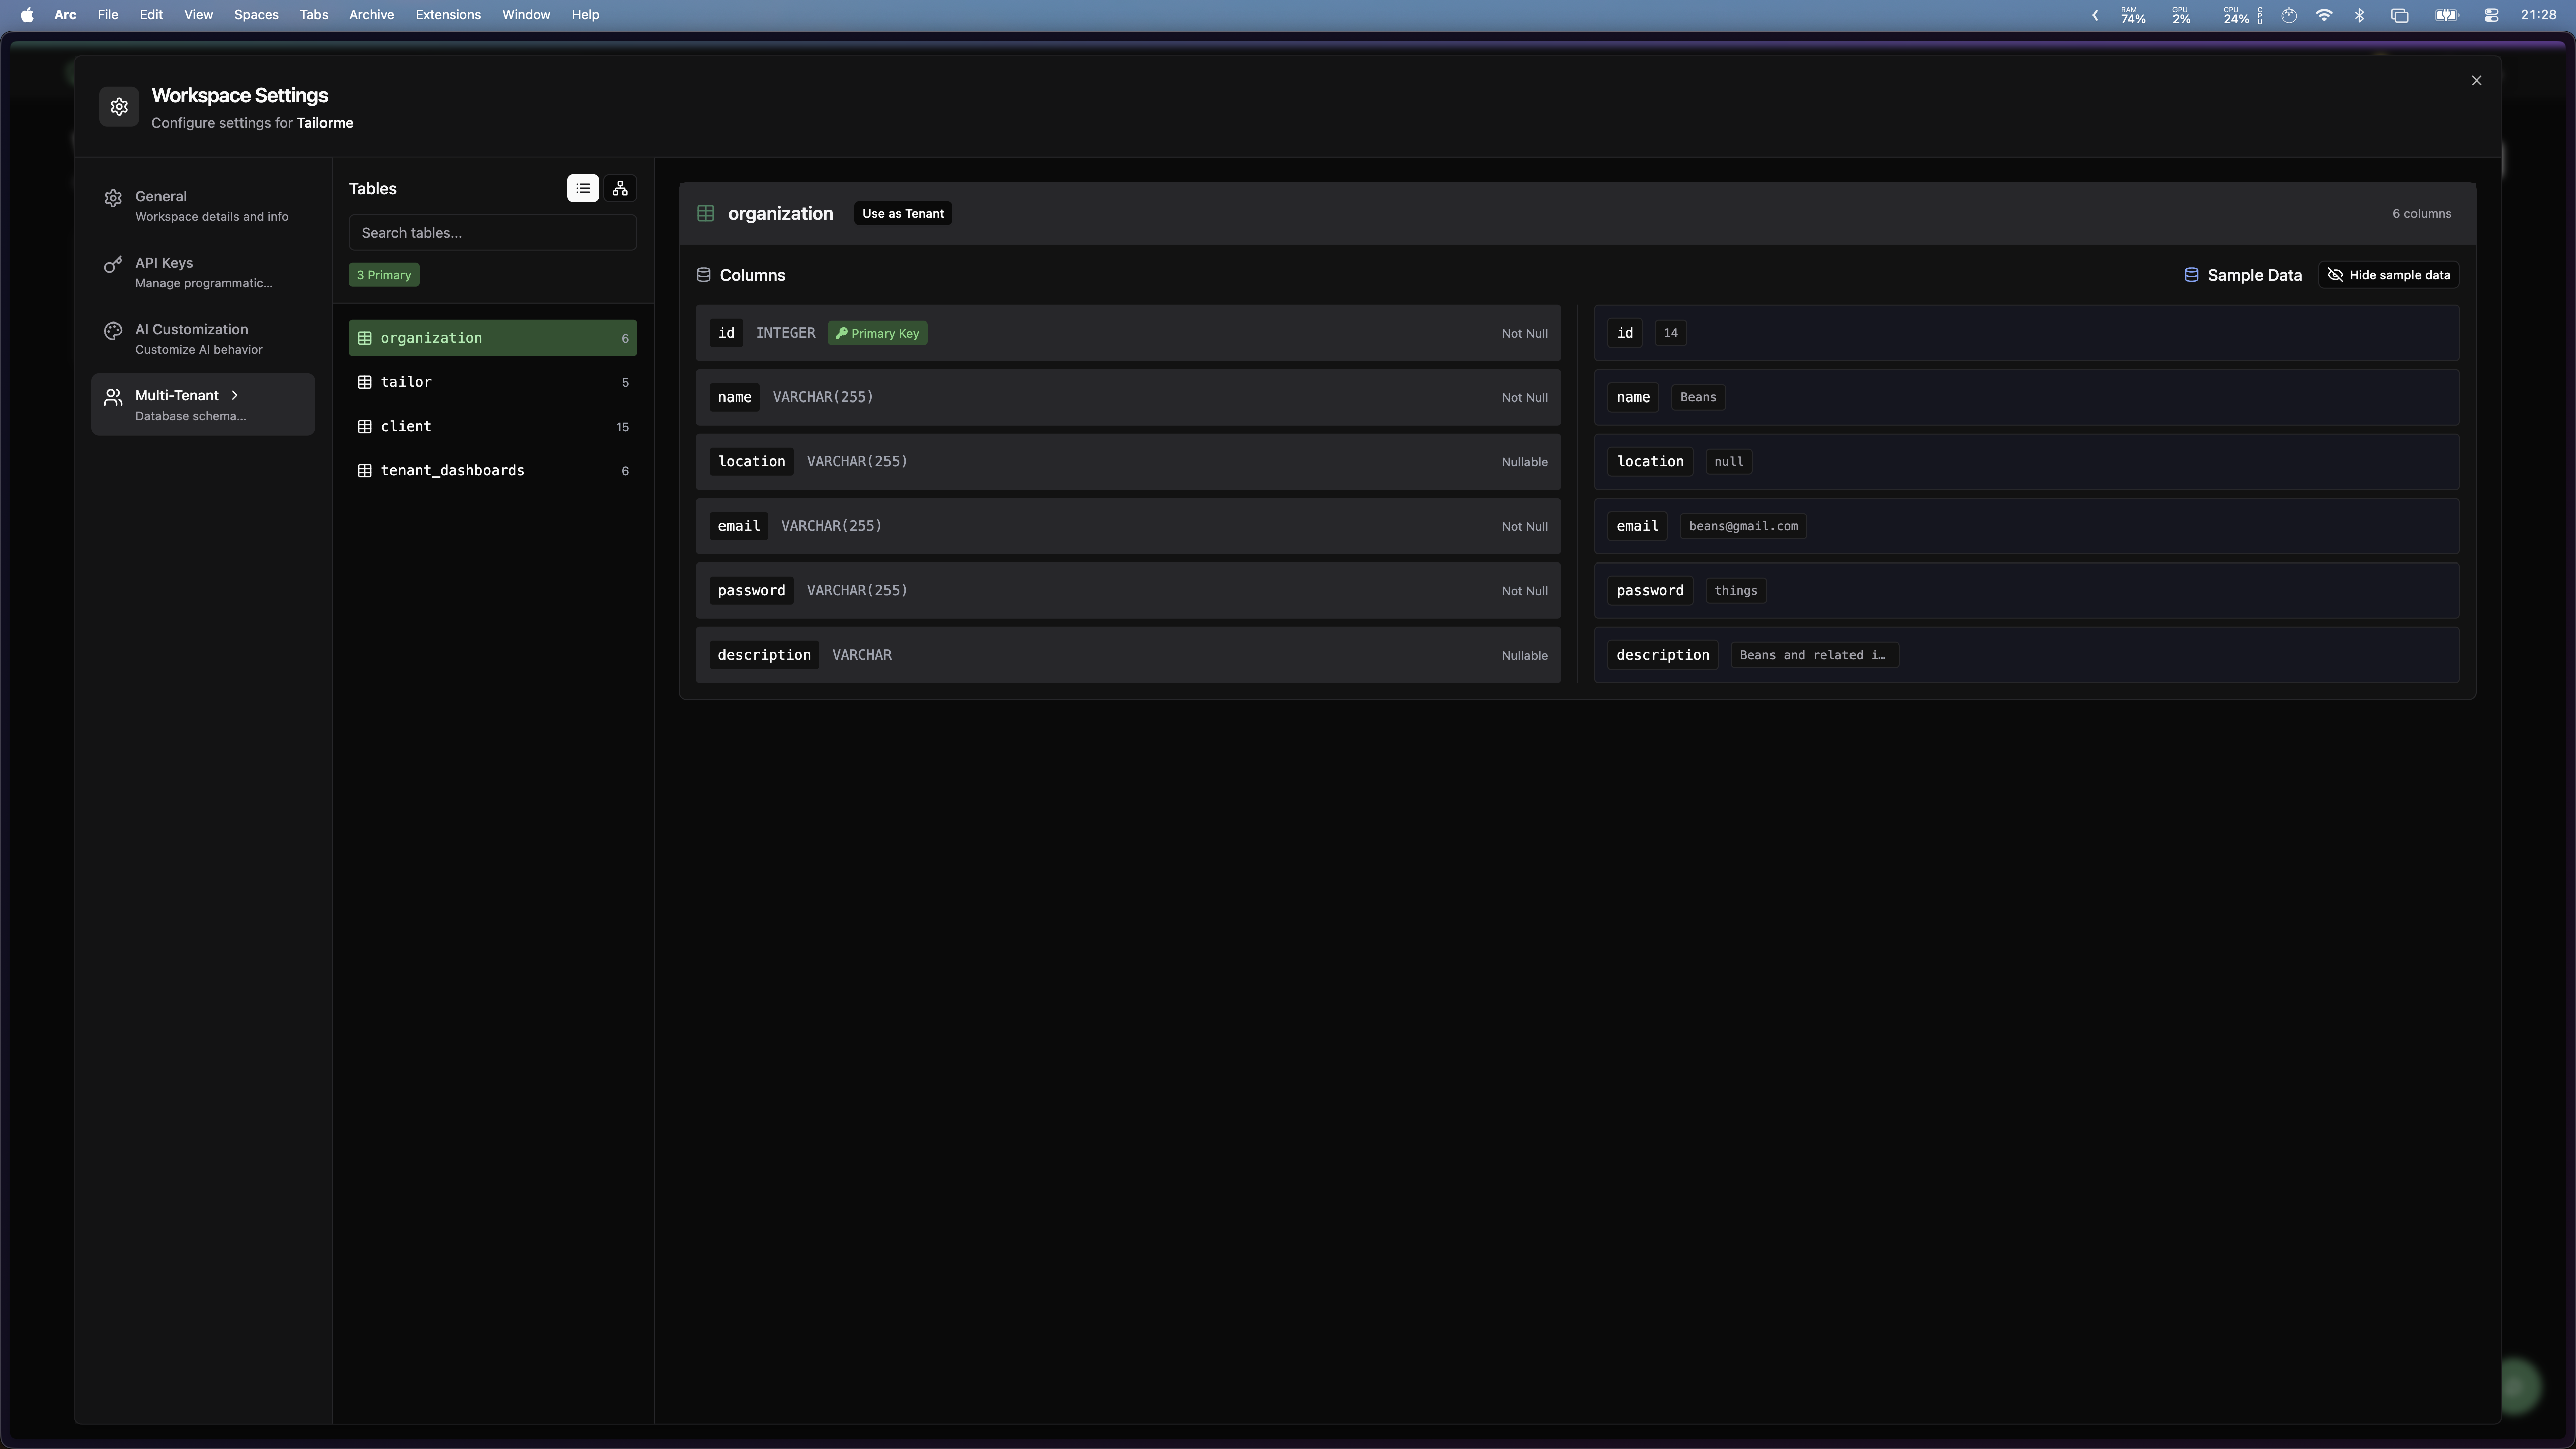 In this example, we're using the `organization` table as our tenant identifier.
### Step 3: Understand and Organize Your Tables
You will be redirected to the **Tenant Table Configuration** page. Papermap automatically analyzes your schema and sorts every table into one of three categories based on how it relates to the tenant table.
In this example, we're using the `organization` table as our tenant identifier.
### Step 3: Understand and Organize Your Tables
You will be redirected to the **Tenant Table Configuration** page. Papermap automatically analyzes your schema and sorts every table into one of three categories based on how it relates to the tenant table.
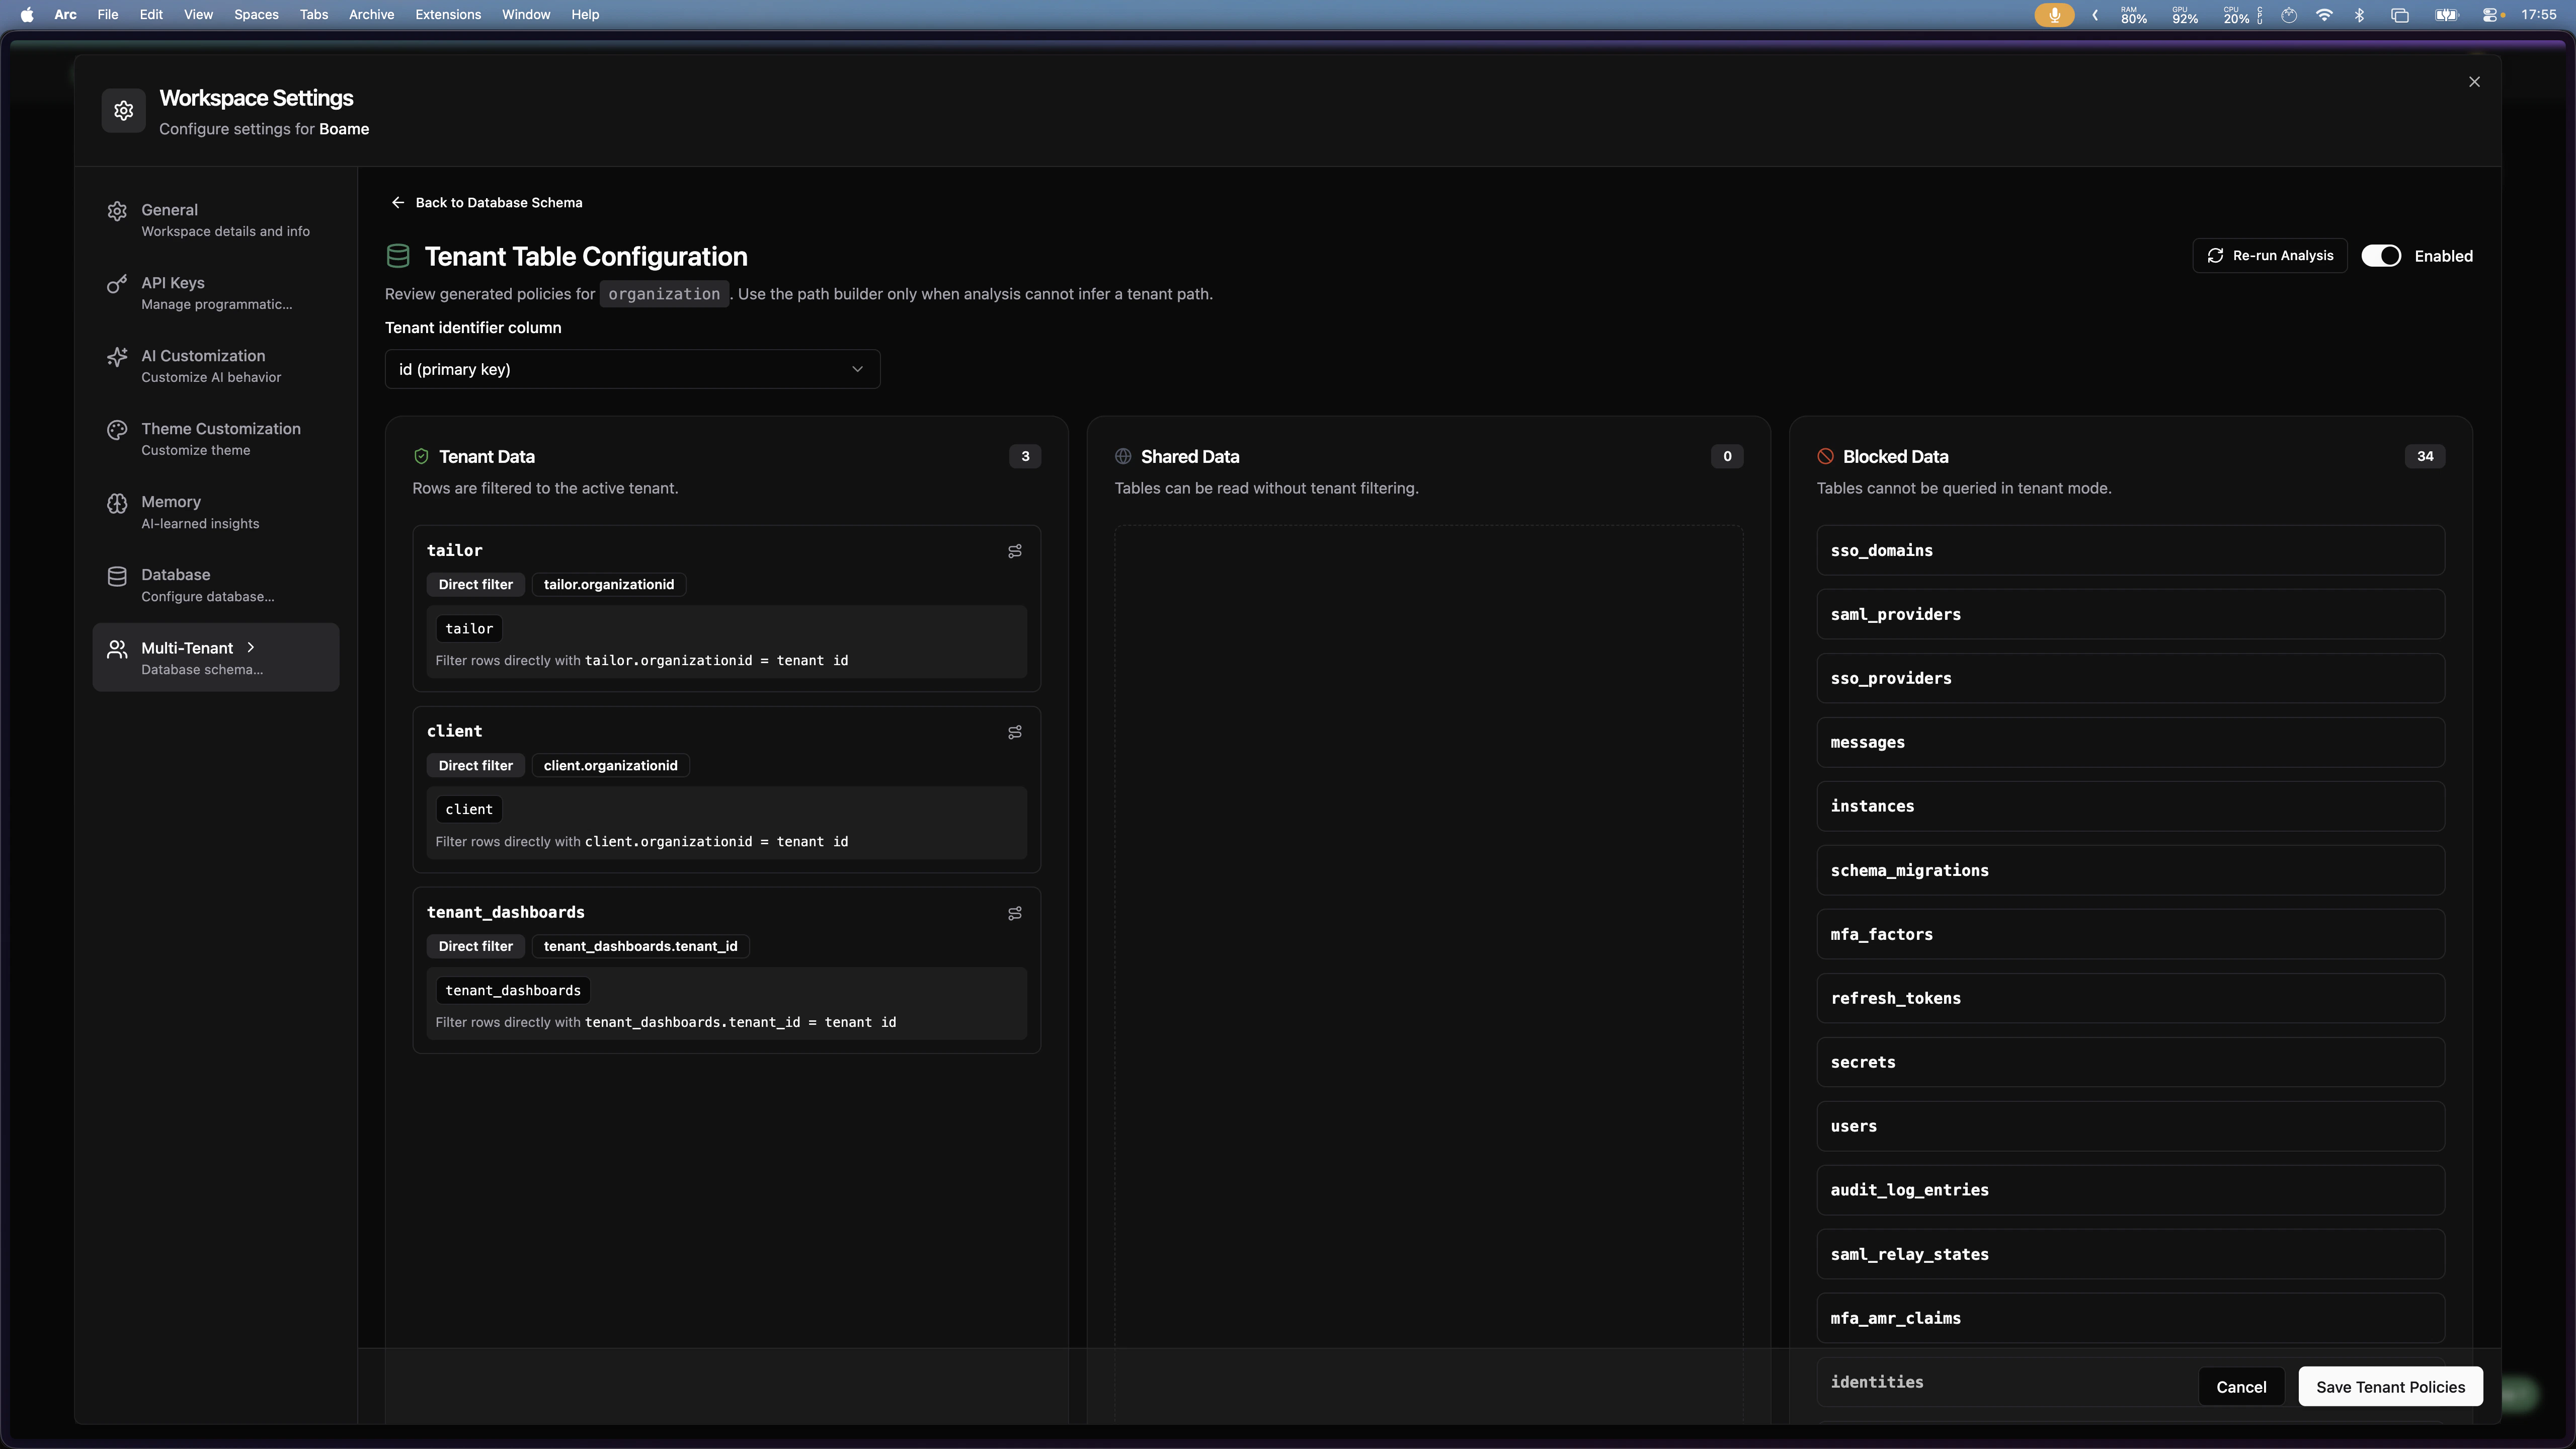 At the top of the page you'll find:
* **Tenant identifier column** — the column on the tenant table (usually the primary key) that the tenant id from API requests will be compared against.
* **Re-run Analysis** — re-runs the auto-categorization. Use this after schema changes.
* **Enabled** toggle — turns multi-tenant enforcement on or off for this workspace.
#### Table Categories Explained
Tables whose rows are filtered to the active tenant on every query.
Papermap fills this category in two ways:
* **Direct filter** — the table contains a column that points to the tenant table (e.g. `tailor.organizationid`). Filtering is applied directly.
* **Join path** — the table has no direct tenant column, so a chain of joins is used to reach the tenant id. You define this chain using the path builder (see Step 4).
**Examples:** user accounts, orders, transactions, dashboards, anything tenant-owned.
Tables that can be read by every tenant without filtering.
**Examples:**
* Product catalogs
* Country / region reference data
* System configuration
* Lookup tables
Tables that cannot be queried at all in tenant mode.
**Examples:**
* Auth tables (`users`, `sso_providers`, `mfa_factors`, `refresh_tokens`)
* Audit logs and system metadata
* Internal admin or billing tables
#### Organize Your Tables
Review the auto-categorization and adjust anything that doesn't match your security requirements.
Check which tables Papermap placed in **Tenant Data**, **Shared Data**, and **Blocked Data**.
Drag and drop tables between the three columns to override the automatic placement.
Move anything tenants should never see (admin tables, audit logs, billing) into **Blocked Data**.
Put catalogs, lookups, and reference tables into **Shared Data** so they remain readable across tenants.
Click **Save Tenant Policies** at the bottom of the page.
**Quick Reference:**
* **Tenant Data**: any table with tenant-owned rows — direct foreign key or reachable via a join path
* **Shared Data**: product catalogs, country/region reference data, lookups
* **Blocked Data**: auth tables, audit logs, system metadata, billing
In this example, business tables sit in **Tenant Data** while auth and system tables are auto-placed in **Blocked Data**.
### Step 4: Define a Tenant Access Path (when needed)
Some tables in **Tenant Data** don't contain the tenant id directly. For these, you need to tell Papermap how to reach the tenant id by joining through one or more other tables.
On the table card in **Tenant Data**, click the join/path icon in the top-right corner. The **Tenant Access Path** modal opens.
Set the four fields under **Join 1**:
* **Starting table for this join** — the table you're configuring.
* **Table it joins to** — the next table in the path toward the tenant table.
* **Column on \
At the top of the page you'll find:
* **Tenant identifier column** — the column on the tenant table (usually the primary key) that the tenant id from API requests will be compared against.
* **Re-run Analysis** — re-runs the auto-categorization. Use this after schema changes.
* **Enabled** toggle — turns multi-tenant enforcement on or off for this workspace.
#### Table Categories Explained
Tables whose rows are filtered to the active tenant on every query.
Papermap fills this category in two ways:
* **Direct filter** — the table contains a column that points to the tenant table (e.g. `tailor.organizationid`). Filtering is applied directly.
* **Join path** — the table has no direct tenant column, so a chain of joins is used to reach the tenant id. You define this chain using the path builder (see Step 4).
**Examples:** user accounts, orders, transactions, dashboards, anything tenant-owned.
Tables that can be read by every tenant without filtering.
**Examples:**
* Product catalogs
* Country / region reference data
* System configuration
* Lookup tables
Tables that cannot be queried at all in tenant mode.
**Examples:**
* Auth tables (`users`, `sso_providers`, `mfa_factors`, `refresh_tokens`)
* Audit logs and system metadata
* Internal admin or billing tables
#### Organize Your Tables
Review the auto-categorization and adjust anything that doesn't match your security requirements.
Check which tables Papermap placed in **Tenant Data**, **Shared Data**, and **Blocked Data**.
Drag and drop tables between the three columns to override the automatic placement.
Move anything tenants should never see (admin tables, audit logs, billing) into **Blocked Data**.
Put catalogs, lookups, and reference tables into **Shared Data** so they remain readable across tenants.
Click **Save Tenant Policies** at the bottom of the page.
**Quick Reference:**
* **Tenant Data**: any table with tenant-owned rows — direct foreign key or reachable via a join path
* **Shared Data**: product catalogs, country/region reference data, lookups
* **Blocked Data**: auth tables, audit logs, system metadata, billing
In this example, business tables sit in **Tenant Data** while auth and system tables are auto-placed in **Blocked Data**.
### Step 4: Define a Tenant Access Path (when needed)
Some tables in **Tenant Data** don't contain the tenant id directly. For these, you need to tell Papermap how to reach the tenant id by joining through one or more other tables.
On the table card in **Tenant Data**, click the join/path icon in the top-right corner. The **Tenant Access Path** modal opens.
Set the four fields under **Join 1**:
* **Starting table for this join** — the table you're configuring.
* **Table it joins to** — the next table in the path toward the tenant table.
* **Column on \** — the column on the starting table used for the join.
* **Matching column on the joined table** — the column on the joined table that matches.
Click **+ Add Join Table** for multi-hop paths (e.g. `order_items` → `orders` → `organization`). Repeat the four fields for each hop.
Under **Tenant id location**, choose the table and column at the end of the path that hold the actual tenant id.
Click **Save Path**. The card now shows the resolved filter rule.
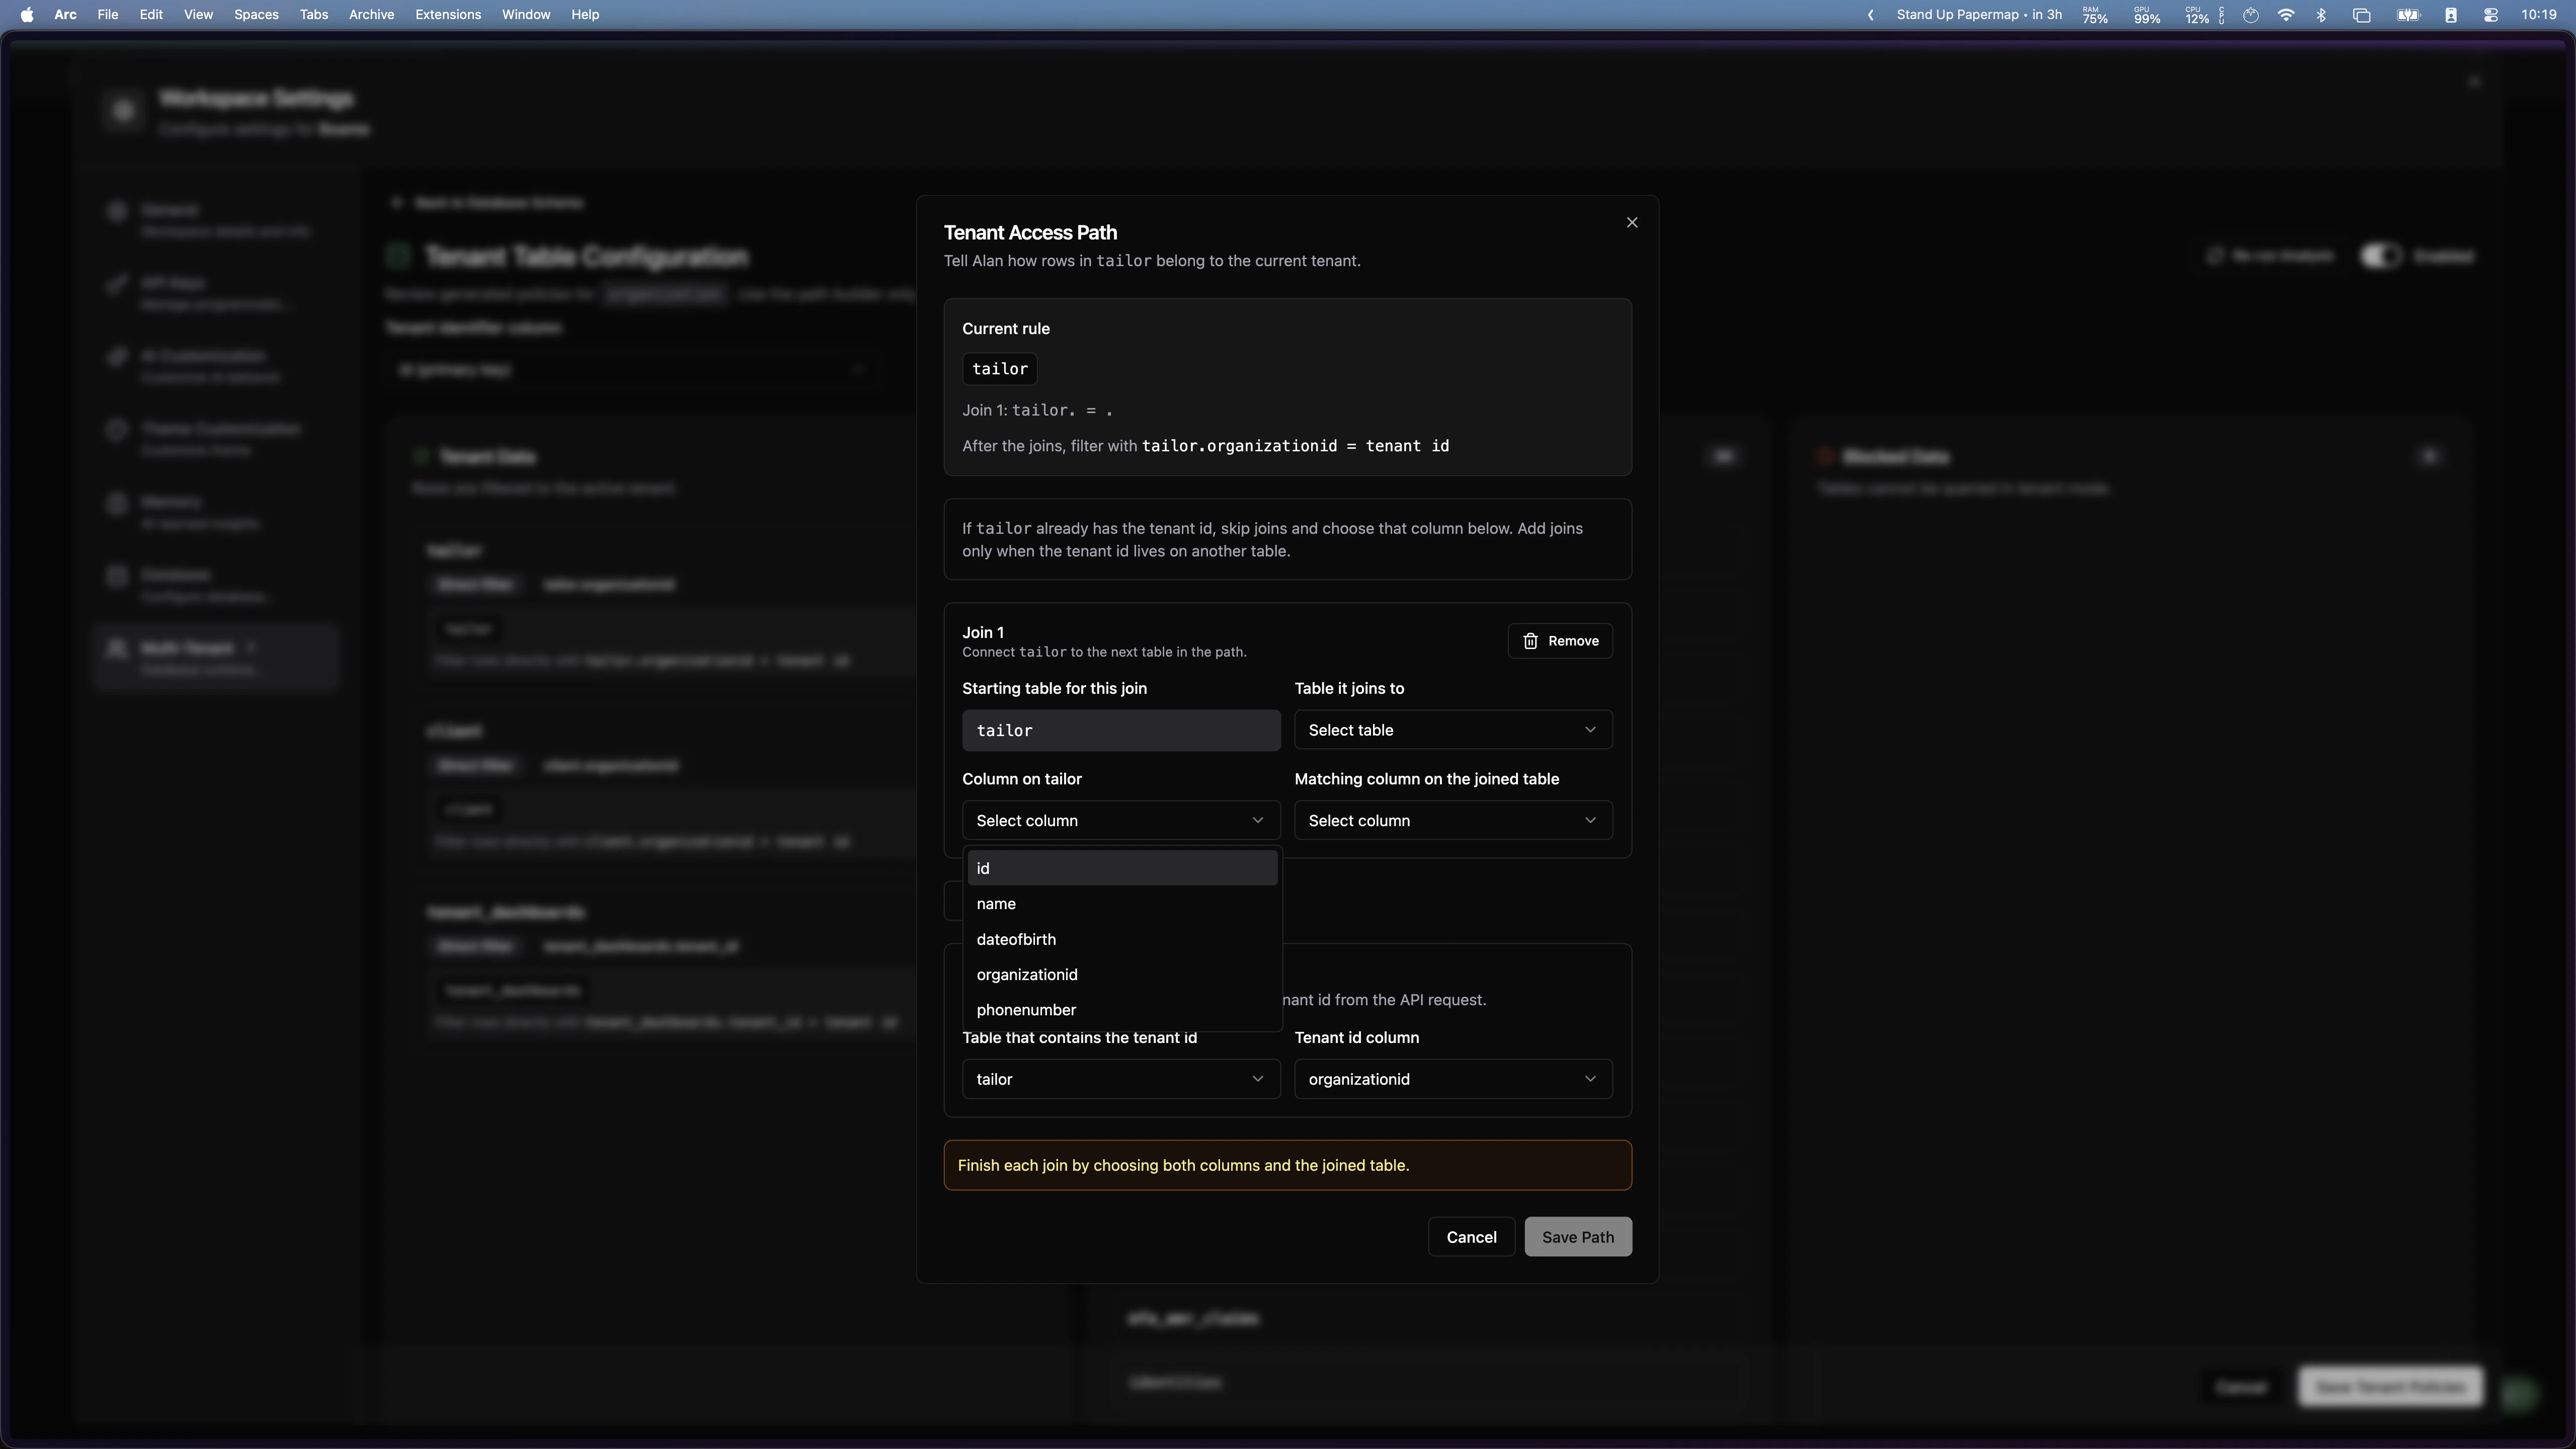 Use the path builder only when auto-analysis cannot infer a path. Tables with a direct foreign key to the tenant table are detected automatically and need no join configuration.
### Step 5: Create API Keys
After organizing your tables, create API keys for tenant access.
Click **Configure as Tenant Table** to save your table organization.
Go back to **Settings** → **API Keys**.
Click **Create API Key** to generate credentials.
Copy and securely store both the **API Key** and **Secret**.
Use the path builder only when auto-analysis cannot infer a path. Tables with a direct foreign key to the tenant table are detected automatically and need no join configuration.
### Step 5: Create API Keys
After organizing your tables, create API keys for tenant access.
Click **Configure as Tenant Table** to save your table organization.
Go back to **Settings** → **API Keys**.
Click **Create API Key** to generate credentials.
Copy and securely store both the **API Key** and **Secret**.
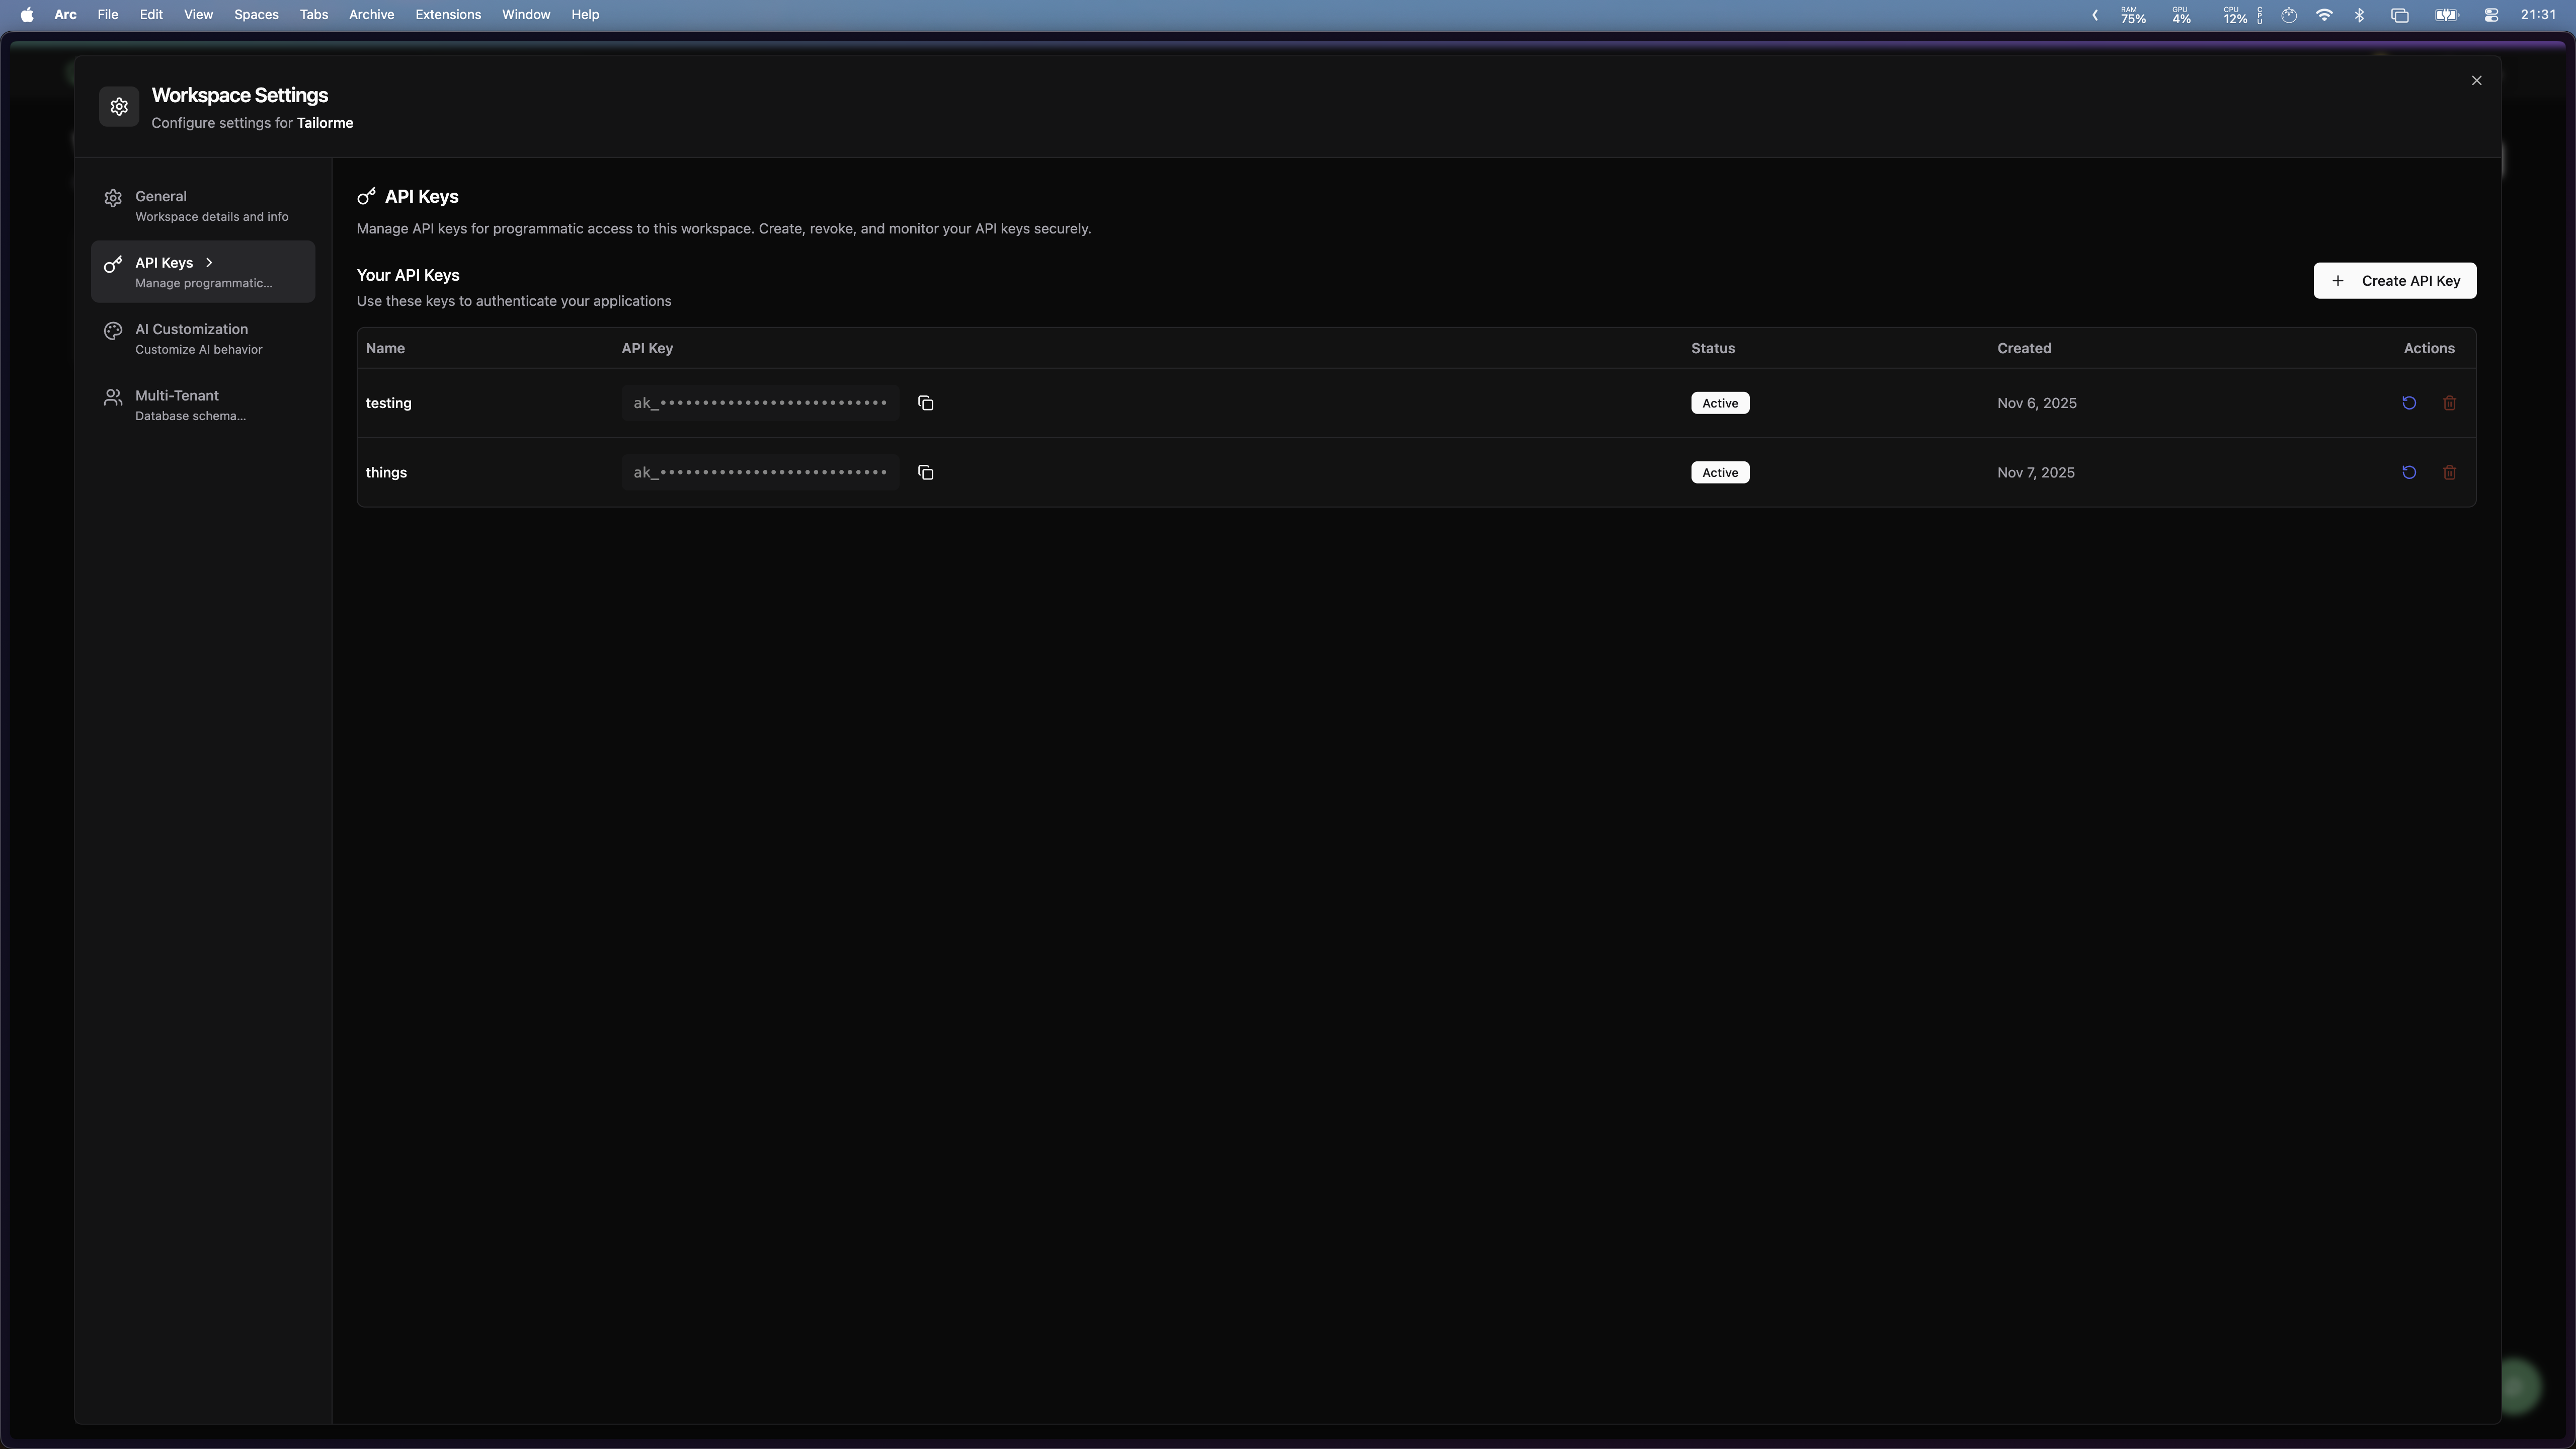 **Important:** Save both the API Key and Secret securely. The Secret will only be shown once and cannot be retrieved later. Store it in a secure location like a password manager or secrets management system.
### Step 6: Complete Configuration
Your multi-tenancy setup is now complete!
## What Happens Next?
Once configured, your multi-tenant environment will operate as follows:
Each tenant only sees rows from **Tenant Data** tables that belong to them — whether filtered by a direct column or resolved through a join path.
**Shared Data** tables remain accessible to all tenants for common reference data.
**Blocked Data** tables are completely hidden from tenant queries.
Queries are automatically scoped to the tenant context.
## Next Steps
Implement secure tenant dashboard management with HMAC authentication
Learn how to manage tenant lifecycles and operations
## Troubleshooting Setup
* Ensure your data source is properly connected
* Verify the table exists and has the expected schema
* Check that you have read permissions on the table
* Verify foreign key relationships in your database
* Manually move tables to the correct categories
* Check table relationships in your data source
* Ensure you have administrative permissions
* Check that you saved the tenant table configuration first
* Try refreshing the page and generating again
**Important:** Save both the API Key and Secret securely. The Secret will only be shown once and cannot be retrieved later. Store it in a secure location like a password manager or secrets management system.
### Step 6: Complete Configuration
Your multi-tenancy setup is now complete!
## What Happens Next?
Once configured, your multi-tenant environment will operate as follows:
Each tenant only sees rows from **Tenant Data** tables that belong to them — whether filtered by a direct column or resolved through a join path.
**Shared Data** tables remain accessible to all tenants for common reference data.
**Blocked Data** tables are completely hidden from tenant queries.
Queries are automatically scoped to the tenant context.
## Next Steps
Implement secure tenant dashboard management with HMAC authentication
Learn how to manage tenant lifecycles and operations
## Troubleshooting Setup
* Ensure your data source is properly connected
* Verify the table exists and has the expected schema
* Check that you have read permissions on the table
* Verify foreign key relationships in your database
* Manually move tables to the correct categories
* Check table relationships in your data source
* Ensure you have administrative permissions
* Check that you saved the tenant table configuration first
* Try refreshing the page and generating again